CASH RECEIPTING
DESCRIPTION: Cash Receipting is used to enter and print receipts for your customers when receiving payments. Cash Receipting is also used to post cash/check payments for those items that are not billed out to a customer. These can be reimbursement checks from vendors, rebates from manufacturers, monies received for miscellaneous items such as permits, maps, etc. NOTE: DO NOT USE THIS PROGRAM IF YOU ARE RECEIVING CASH/CHECK FOR AN ITEM THAT YOU BILLED FOR A CUSTOMER. That needs to be done through the PAYMENT POST menu item. This program is more for walk-in items that you would not normally type up an invoice for.
NOTE: Before you can use Cash Receipting, you must set up the bill codes (in the Bill Codes menu item) for the items you would put on the receipt. (REMEMBER to make the Bill Code Type CASH RECEIPTING!) You will also need the appropriate Debit and Credit account numbers. For more information on Bill Codes see: Bill Codes
Make sure to create the SOURCE OF ENTRY CRJ (Cash Receipt Journal). This can be done in the General Ledger module under the Source of Entry menu item. Because the Cash Receipting keeps track of Receipt Numbers, the very first time you start receipting through Pro Fund Accounting, you should enter the LAST PAPER RECEIPT NUMBER you used under the CONTROL #.
Now that you have set up your bill codes, and set up your Source of Entry called Cash Receipt Journal, you are ready to start entering receipts.
To access: Click on the Customers module  then click the Cash Receipting menu item.
 ![]()
The following window will appear:
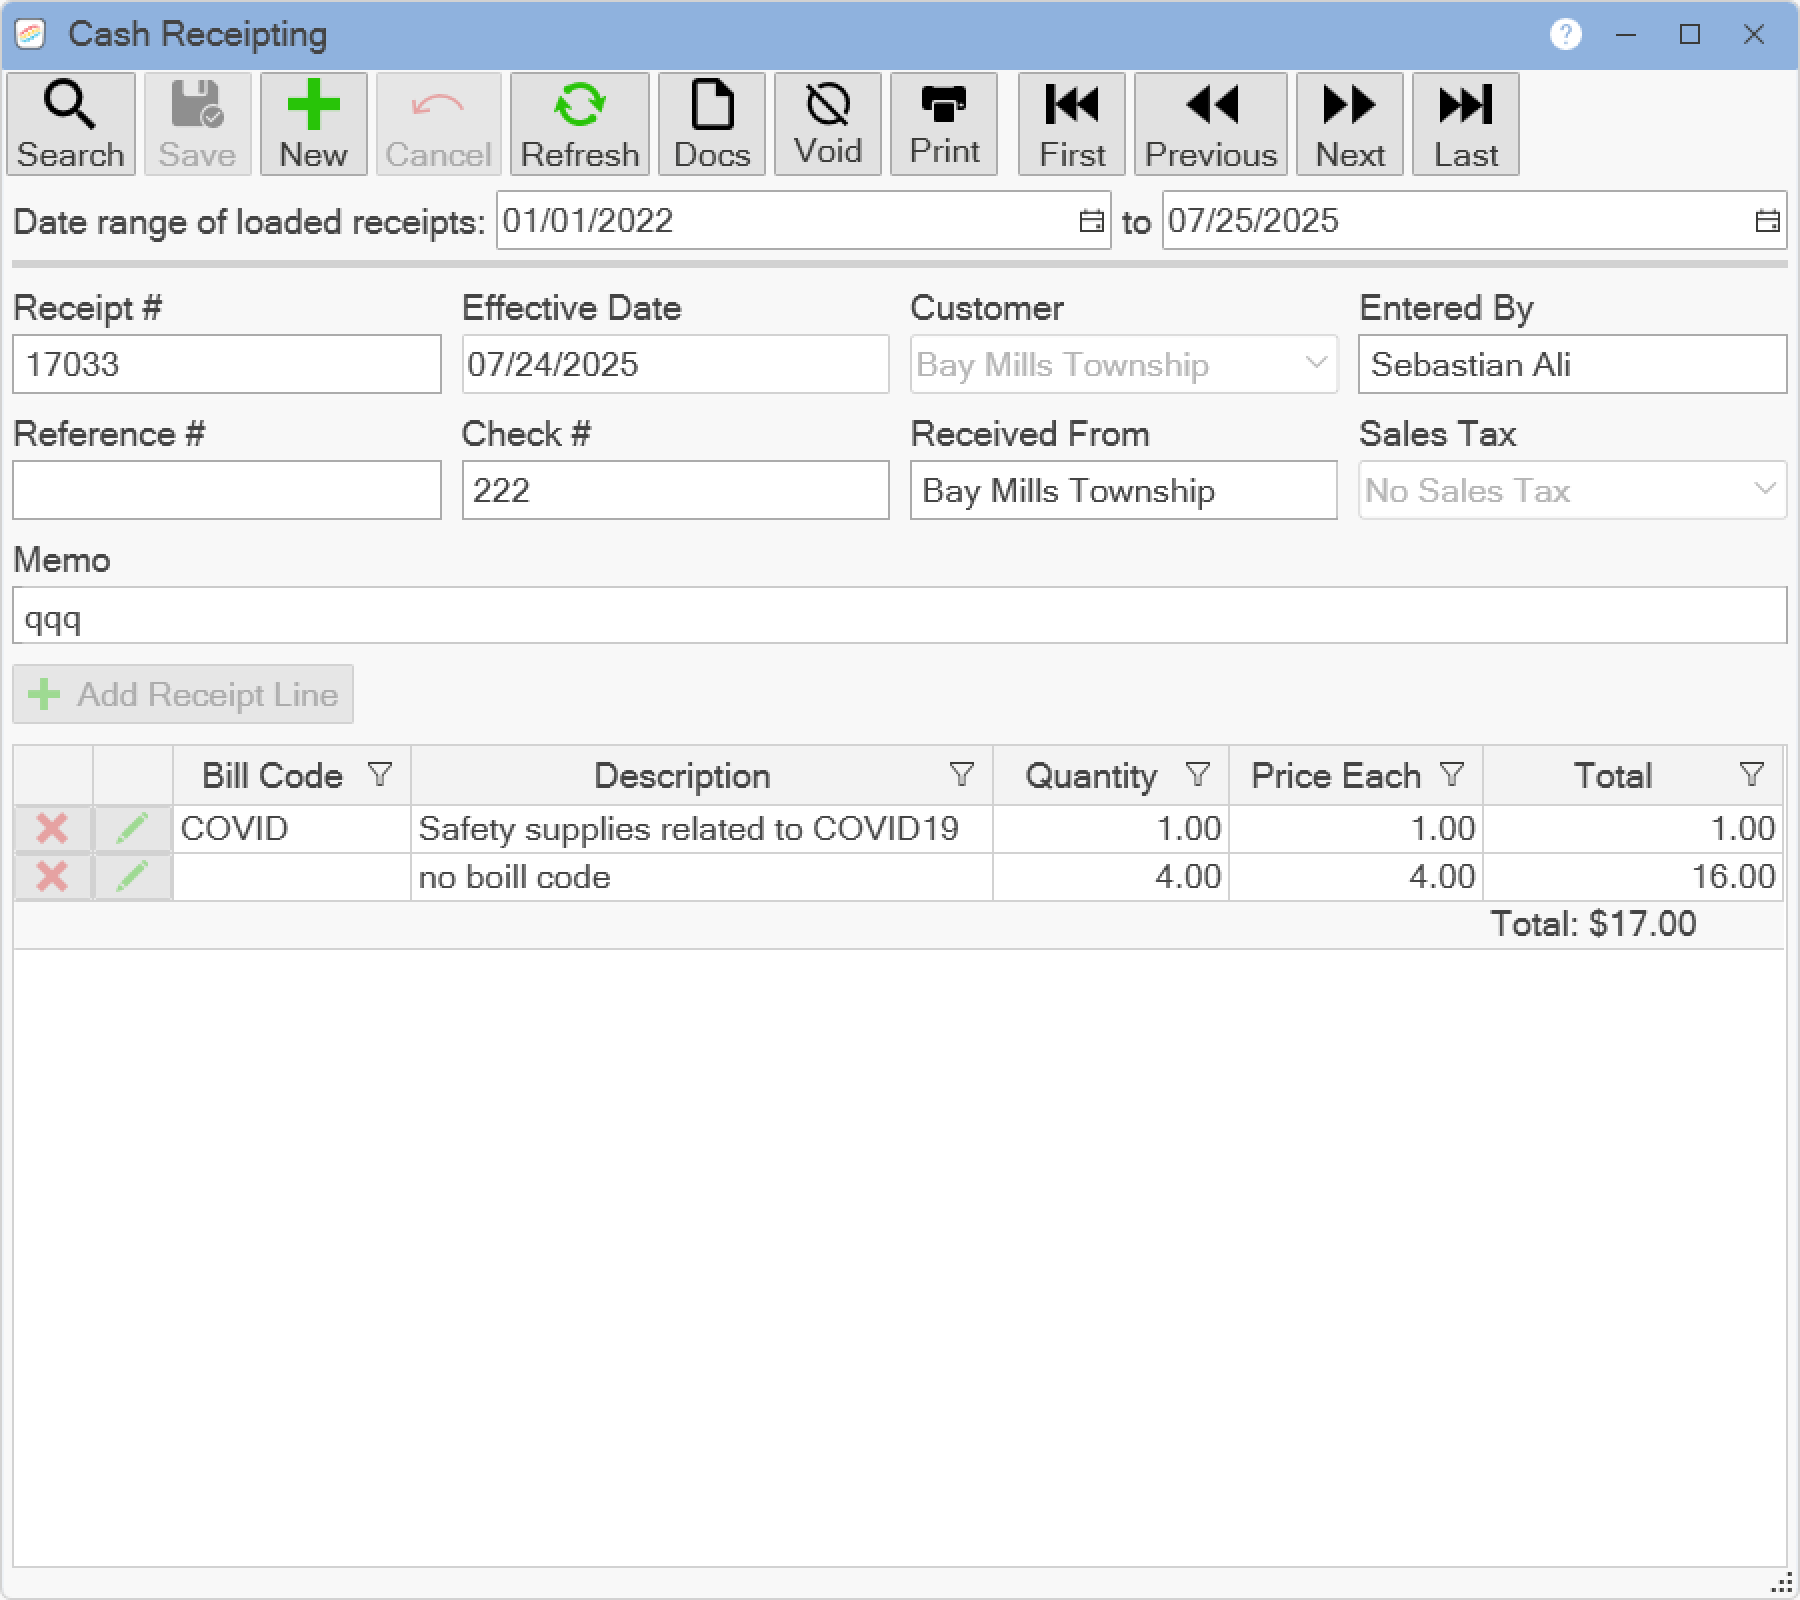

At the top of the window there is a tool bar which contains common functions for each employee. The tool bar buttons have hot key functionality, and you can see the key combination for each button by hovering your cursor over the button.
The following is a list of the hot key combinations:
Search: Alt-E
Save: Alt-S
Add New: Alt-N
Cancel Add: Alt-C
Delete: Alt-D
Refresh: Alt-R
Print: Alt-P
Document Management: Alt-O
First: Alt-HOME
Previous: Alt-LEFT Arrow
Next: Alt-RIGHT Arrow
Last: Alt-END
Any cash receipt that has an effective date within the default date range will be loaded. The default Date range of loaded receipts starts two years from the fiscal year start date and ends on the current date. You can change the date range and click the Refresh button at the top of the window to load all the receipts that have an effective date in the new date range.
To enter a new cash receipt, click the New button at the top of the window. The Receipt # will automatically be filled in when you save the new receipt. Specify a date for when the payment was received in the Effective Date field. If this is a regular receipt, select the Customer by using the drop down list and the Received From field will automatically be filled in. Otherwise, enter in who the payment was received from in the Received From field. The Entered By field is for you to enter who is posting this receipt and is automatically filled in with the user's first and last name. For the Reference #, you can enter information that is specific to the item you are receipting. Example: The Permit Number of the permit the person is paying for. Enter the Check # if applicable, or you can type in the method in which you received payments, such as CASH or WIRE. The Memo field is for any information you would like to be printed on the receipt.
Click the Add Receipt Line button to add a new receipt line to the posting. Select a Bill Code from the drop down list if you need a Bill Code on the line. The Description, default Quantity, and default Price Each will automatically be filled in with the values from the selected Bill Code. To edit, click the pencil icon in the data grid to either override the credit or debit accounts if you selected a Bill Code or enter in the credit and debit accounts if you do not want to specify a Bill Code. You will have to enter in the credit and debit accounts if you wanted to create a blank line with no information filled in.
When you are finished creating a new cash receipt, click the Save button at the top of the window to save the receipt or the Cancel button at the top of the window to cancel the creation of a new cash receipt. A confirmation window will appear asking if you want to print your receipt. Click Yes to print; click No to not print. If you selected Yes to print, the receipt will show in the Report Viewer window. Click the Print button to print it out. You also have the option to Export this receipt to a file. On the Report Viewer window, click on the X in the upper right corner of the window to close the window. PLEASE NOTE: Once you click Save on a new cash receipt, you will NOT be able to make changes. You will only be able to void it.
Click the Void button at the top of the window to void a cash receipt if the selected receipt has not already been deposited using the Make Deposits menu item in the General Ledger module. This will set the total amount of the receipt to zero. NOTE: By clicking the Void button, the receipt will be removed from your cash account and the sale or reimbursement from your revenue or expense account. HOWEVER, it does NOT remove the receipt number from the file. Once you have clicked the Void button, a confirmation window will appear asking you to Confirm void of this receipt and all its line items. Click OK to continue with the void; click Cancel to leave the receipt as is. Once the receipt has been voided, it will now say Voided in front of the name in the Received From field. If you need a copy of the voided receipt, click on the Print button. You will see that the word Voided is before the name and also the amounts of the invoice are zero.
Click the Print button at the top of the window to print the receipt.
If you need to include sales tax with your cash receipting post, select a Sales Tax Bill Code from the Sales Tax drop down list. Bill Codes that have a type Sales Tax will appear in the Sales Tax drop down list. You can set up the Sales Tax information in the Bill Codes menu item. When you click the Save button, the Sales Tax will automatically be calculated for each Bill Code listed that has the required Sales Tax box checked (in the Bill Codes menu item). A line will be added with the Sales Tax Bill Code and have the total amount of sales tax calculated in the Total column.
Please see the following topic for help with Document Management ![]() : Document Management
: Document Management
Click on the X in the upper right corner of the window to close the window.