MODIFYING USERS
DESCRIPTION: After a new user gets setup, you will need to modify that user to give them permissions to perform activities in Pro Fund Accounting. You may also need to modify existing users as roles may change and require different permissions than before. To change an existing user's permissions, you would start by going to the main Pro Fund Accounting Security screen.
=========================================================
.png)
You would then click on the Edit button  for the user that you want to change permissions for.
After clicking on the edit button, the following screen will show you detailed permissions for the user that you selected:
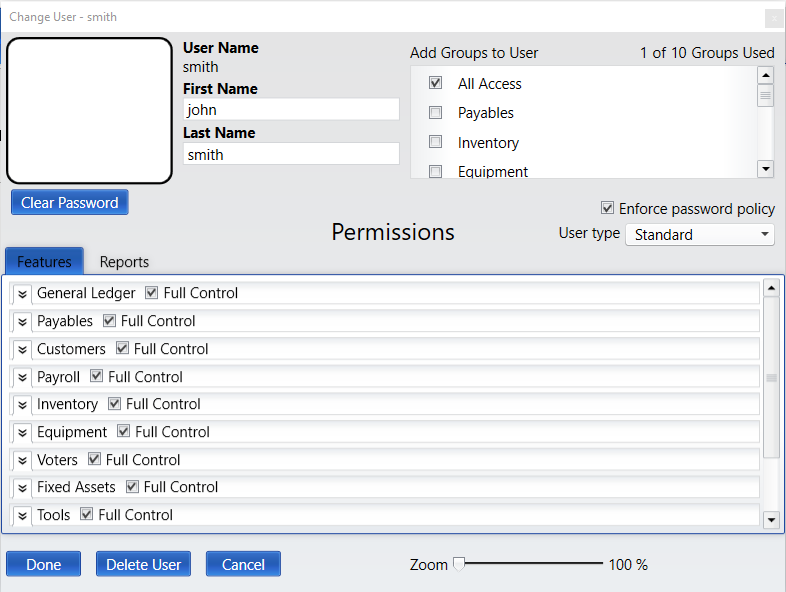
1. Image: This box will display a picture of the user.
.png)
2. User Name, First & Last Name: Displays the User Name, First Name, and Last Name of User. The First Name and Last Name can be changed here.
.png)
3. Groups: The groups that this user is a part of. Checking the box next to the group name adds the user to the group and removing the check in the box next to a group removes the user from that group.
.png)
4. Clear Password: This button will clear the user's password.
![]()
5. Enforce Password Policy: This will enforce the password policy defined in the Preferences section for this user and is enabled by default. If this user is to be exempt from the password policy, then you will need to clear the check.
![]()
6. User Type: This defines what user type this user is. The available types are: Standard and Administrator.
![]()
7. Feature Permissions: This section allows you to change the permissions for each feature in Pro Fund Accounting for an individual user. The permissions shown here also include the permissions for each of the groups that this user is assigned to.
.png)
8. Read-only view of accessible reports: Shows a read-only view of the accessible reports that the user is allowed to run.
![]()
9. Done: Saves any changes that were made to this user and closes the window.
![]()
10. Delete User: This button will delete this user.
![]()
11. Cancel: This button closes the window and does not save any changes made to the selected user.
DELETING EXISTING USERS
If you want to delete an existing user, first select the user to delete from the Users list as described above then click the Delete User button.
You can also delete a user directly from the users list by clicking on the delete button shown on the user list. ![]()
You will be asked to confirm the deletion of the user. If you’re sure you want to delete the user, click the YES button; otherwise clicking the NO button will not delete the user.