SYSTEM ![]()
DESCRIPTION: The SYSTEM tab under Settings allows you to set certain preferences throughout the system.
===========================================
To access the SYSTEM tab, click on the SETTINGS button at the bottom of the main screen (left-hand corner), ![]() then click the SYSTEM tab
then click the SYSTEM tab ![]() on the left-hand side and the following screen will appear:
on the left-hand side and the following screen will appear:
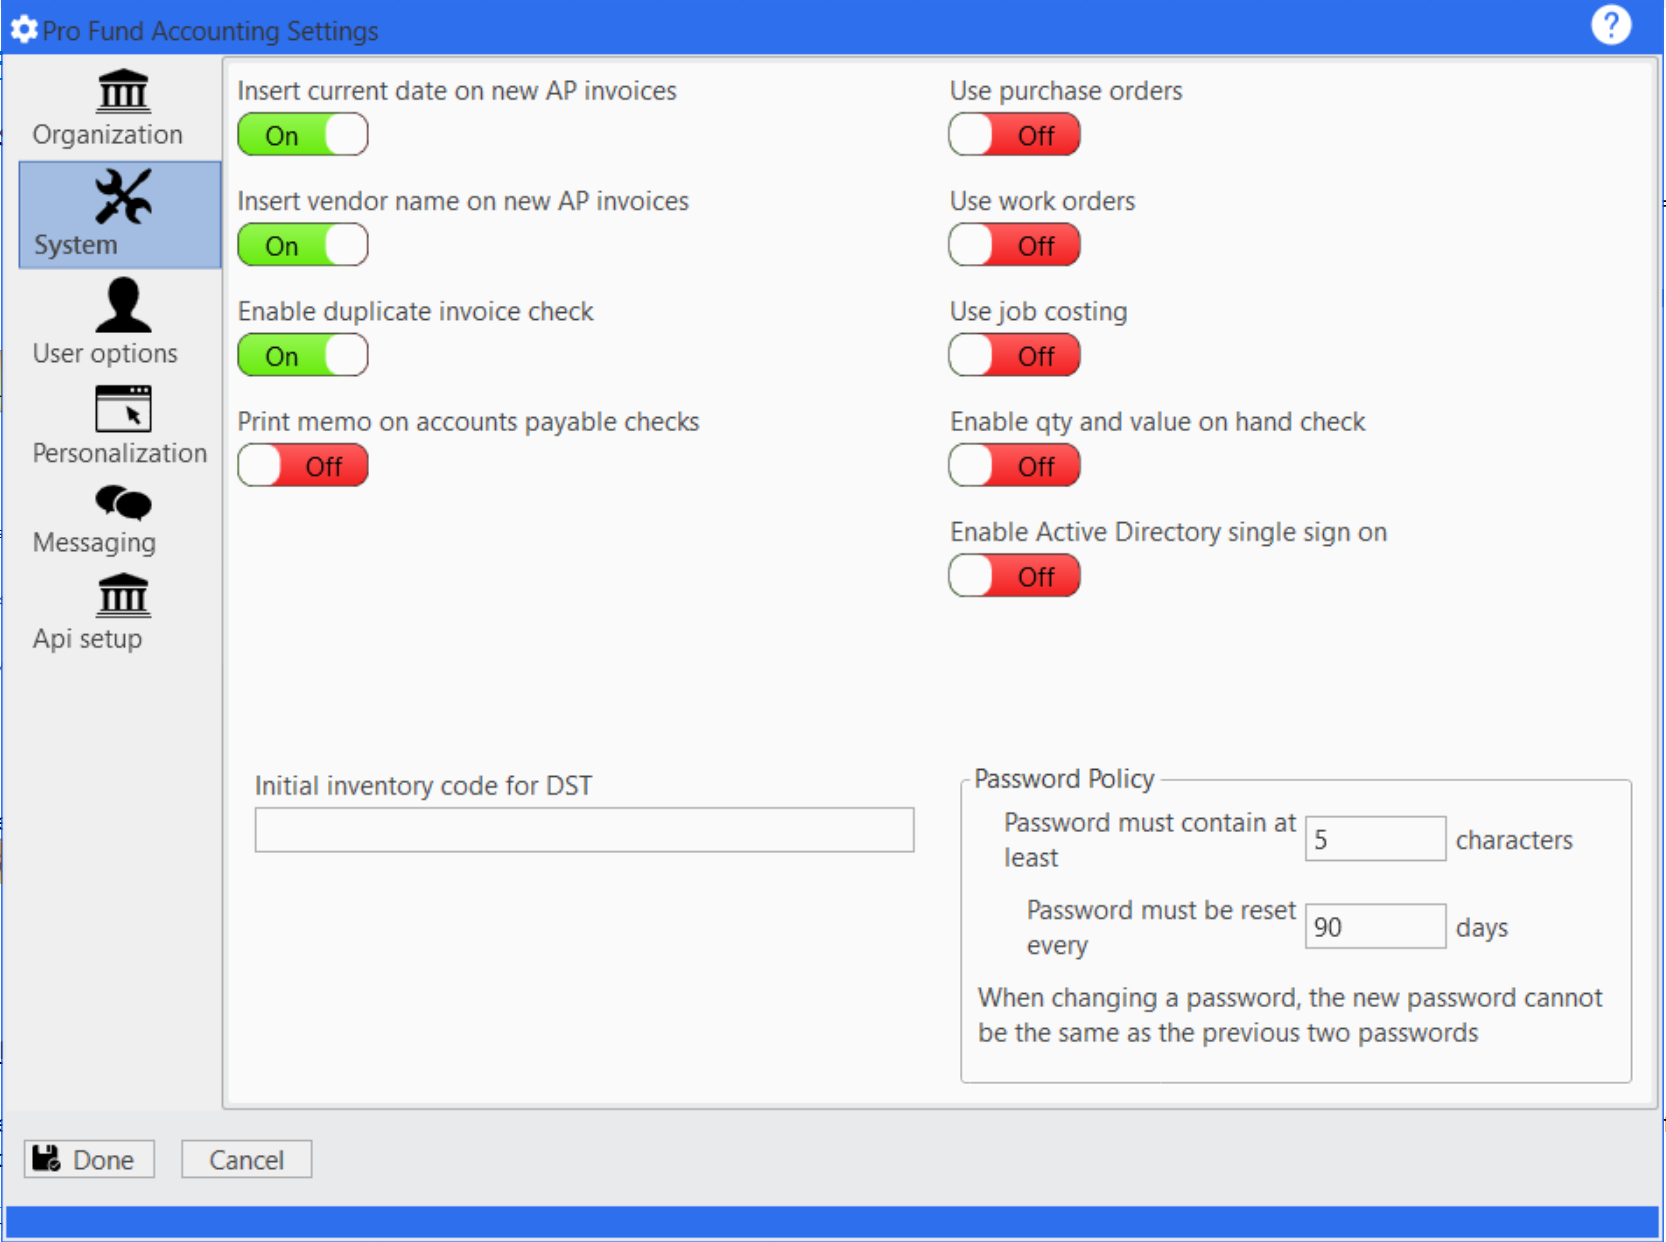
We will now discuss each of the options you have available. (NOTE: If you are new customer to Pro Fund Accounting, all the options will default to OFF when you receive the software.)
1.INSERT CURRENT DATE ON NEW INVOICES: ![]()
Turning this option to ON will cause the AP Post program to automatically insert the current date on new invoices being posted. If you want to properly age invoices for net and discount purposes, then you should leave the box as OFF. Leaving the box in the OFF position will cause the AP Post program to ask you for an invoice date for each new invoice you enter.
2.INSERT VENDOR NAME ON NEW INVOICES: ![]()
Turning this option to ON will cause the AP Post program to automatically enter the last vendor posted to for each new invoice. If you want to enter the vendor’s name or code every time you post a new invoice, you should select OFF for this option.
3.ENABLE DUPLICATE INVOICE CHECK: ![]()
Leaving this option on OFF will cause the AP Post program to not check to see if the invoice number being entered has been posted for this vendor before. If you want to check for duplicate invoice numbers, then you should turn this option ON.
4.PRINT MEMO ON ACCOUNTS PAYABLE CHECKS: ![]()
Turning this option to ON will cause the AP check programs to print the information in the "Memo" field that you entered during AP Post on the vendor check stub. If you do not wish the "Memo" field to print, then switch the option to OFF.
5.USE PURCHASE ORDERS: ![]()
This box relates to the AP Post program and determines if you need to enter purchase order numbers for the invoices you’re posting. If you don’t use purchase orders, select OFF. If you select ON, that means you’re also using our Purchase Order Calc program and invoices entered in AP Post will have had an associated, valid purchase order number generated in Purchase Order Calc.
6.USE WORK ORDERS: ![]()
This box relates to the Inventory Post, AP Post and Payroll Post programs, and controls whether you need to enter work order numbers for various job functions performed, inventory items moved or used, or equipment repairs. If you do not use work order numbers, select OFF. If you select ON, that means you’re also using our Work Order Calc program and information posted using Inventory Post, AP Post and Payroll Post will relate to an associated, valid work order number generated in Work Order Calc.
7.USE JOB COSTING: ![]()
This box relates to the Inventory Post, AP Post and Payroll Post programs and controls whether you need to enter Job Types and Quantities. If you want to use Job Costing, select ON. If you do not use Job Costing, select OFF.
8.ENABLE QTY AND VALUE ON HAND CHECK: ![]()
This box relates to the Inventory Post program, and controls whether or not the displayed quantity and value fields automatically update as inventory is being posted.
9.ENABLE ACTIVE DIRECTORY SINGLE SIGN ON: ![]()
This box relates to the Pro Fund Accounting login process, if your organization has an Active Directory domain setup, then enabling this feature will allow the system to automatically login users based on their Windows credentials if the user is mapped properly in the Security program. This does not apply if your organization does not have an Active Directory domain setup.
10.PASSWORD POLICY: ![]()
This is your company's policy on the length of the password required and how often it needs to be changed. This is a system wide policy, not set for each individual.
CHARACTERS: Enter the minimum number of characters that a person must use for their password.
DAYS: Enter the number of days that a password must be reset. 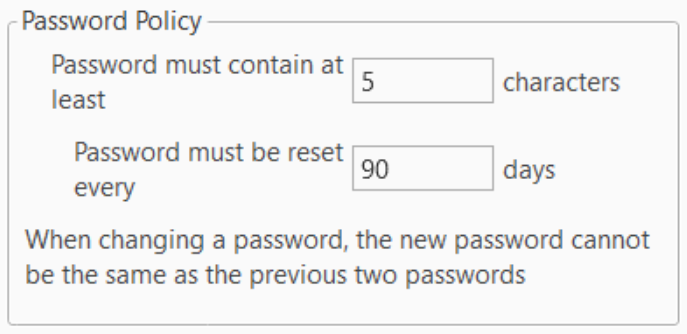
DONE/CANCEL: ![]()
When finished making changes to any of the options explained above, click DONE to save them (or Cancel to return to main screen.) By clicking DONE, your changes will be saved and you will be logged out of the program.