INVENTORY MAINTENANCE
The Inventory Maintenance program allows you to setup, modify, delete, and track inventory items. When you first run the program, the last inventory item you looked at (or was updated) will be displayed. At the very top of the screen is a white box for entering an inventory code. Use this box to search for an inventory record. Next to this area is a small unlabeled button. Clicking this button opens your Inventory Tree where you can search for inventory records.
.png)
Each item has three screens: Location/Factor, Dates/Quantity, and Vendors. Each screen is explained below.
Location/Factor Screen
The items on this screen are self-explanatory with the exception of the Type, Factor, Mul/Div, Units, and Alternate Units fields.
The TYPE field refers to the type of inventory item this is, for example, F for Fuel. Click the drop-down arrow at the end of the Type field to see a list of valid inventory types.
Since some inventory items, such as gravel, can be measured in both yards and tons, you may want to receive the item into inventory in tons, but charge it out or use it based on yards. Therefore, a factor and an equation must be entered for determining the charge price. To implement this feature do the following:
oEnter the "receive by" name into the UNITS field (e.g., TONS).
oEnter the "charge out/use by" name into the ALTERNATE UNITS field (e.g., YARDS).
oEnter the factor to apply against the QTY ON HAND (on the "Dates/Quantity" screen) to arrive at the amount to charge for the ALTERNATE UNITS name.
oEnter an M to multiply or a D to divide.
The calculation takes the factor you have entered and either multiplies or divides the quantity on hand to arrive at the FIXED SELL PRICE (on the "Dates/Quantity" screen). For example:
oUNITS is gallons
oALTERNATE UNITS is quarts
oFACTOR is 4
oMULT/DIV is D
oOn the "Dates/Quantity" screen the QTY ON HAND is 400 gallons
oSo, when the item is used or charged to a customer, the quantity on hand is divided by the factor (400 / 4) to arrive at the ALTERNATE UNITS (100 GALLONS) and the FIXED SELL PRICE is based on quarts rather than gallons.
Dates/Quantity Screen
.png)
The fields on the Dates/Quantity screen relate to the item’s first purchased date, last physical inventory date, values and quantities on hand, minimums and maximums.
Enter the last date a physical inventory was taken for this item.
The original date will automatically be filled in with today’s date. If you need to override this date, do so now; once the item is entered and saved, you will not be able to change this date!
New inventory items will not have an original starting quantity or value; no information may be entered in these two fields. These two fields are "holding" fields for inventory items imported from BETA only. The above screen sample shows a starting quantity and value because it was a record imported from BETA.
If you charge a handling fee to your customers for this item (e.g., you charge a set delivery fee), enter that amount in the HANDLING CHARGE field.
If you have a fixed selling price for the item, enter it in the FIXED SELL PRICE field.
There are multiple "minimum/maximum" fields for your use. Some items need to be stocked heavily during certain periods of the year (e.g. brine for the summer months, salt for the winter months, etc.) You can indicate seasonal start and end month numbers and seasonal minimum/maximum quantities in the appropriate sections on this screen. Underneath the "Seasonal Min Quantity" field are two boxes. In these boxes enter the starting and ending month numbers (not dates!) to use for the quantities in the "Seasonal Min and Seasonal Max Quantity" fields. Our sample screen above shows seasonal quantities and month start and end numbers.
If you don’t need to keep different quantities on hand for a seasonal period, simply enter the normal minimum and maximum quantities for the item.
If you enter a minimum quantity, whenever usage of the item causes the minimum quantity to be reached or exceeded, a purchase order will be generated for it when you run the Purchase Order Calc program, or you may run Purchase Order Post to generate a manual purchase order. Finally, enter the reorder quantity and click the Vendors tab.
Vendors Screen
.png)
You may enter up to four vendor codes from which you order this item. For each vendor code you enter, you will need to enter the vendor’s Part Number, the Price Each and the Minimum Quantity the vendor requires when you place an order.
This information is important when calculating purchase orders. The Purchase Order Calc program looks at this screen to see which of the vendors has the best pricing and will select that vendor for reordering stock. You do not have to set up vendors here if you’re not using the Purchase Order Calc system; however, if you don’t enter vendors and run Purchase Order Calc and the item needs to be reordered, no purchase order will be created for the item.
Printing Inventory Histories
If you want to print a usage history for the current inventory code, click the "Inventory History" button.
Printing Inventory Bar Code Labels
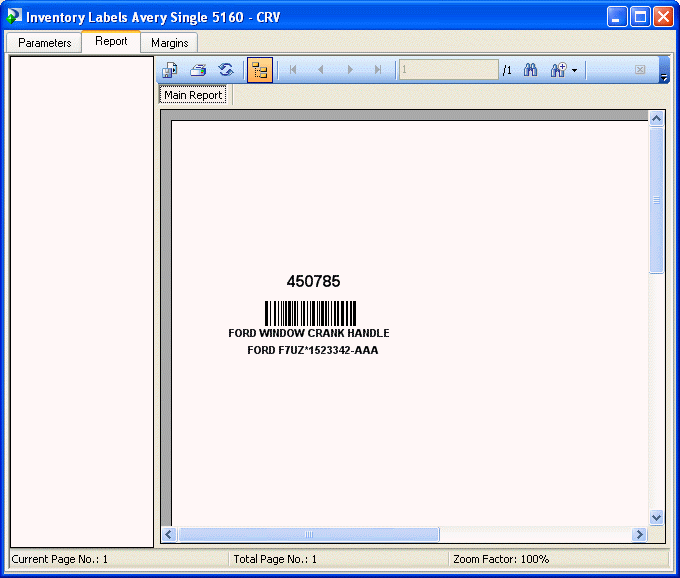
You can print bar code labels for your inventory items by clicking the "Print Single Label" button. These labels are printed one at a time. After entering the label number to print and the number of copies you want, click RUN. You will be asked to enter the inventory code for which you want to print a label. Enter the code and click OK. The above report screen will appear showing the bar code label that will be printed.
So that you don’t waste labels (Avery #5160), you can reuse your label sheet by entering the label number (relative to the label sheet) that you want to print. For example: You have 30 labels on the sheet and you have printed the first seven labels. When you’re ready to print your next label, you would enter "8" on the report parameter screen when you’re asked "ENTER LABEL NUMBER TO PRINT (1 TO 30)."
When you have finished setting up inventory items, click the DONE button to exit the program.