MISCELLANEOUS HELP INFORMATION
The following information could not be placed with the documentation for our other programs, so it is presented here.
Graphic Calendar Help

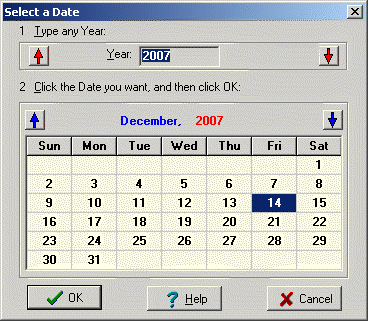
![]() The graphic calendar can be accessed by clicking the small calendar button next to fields requiring a date.
The graphic calendar can be accessed by clicking the small calendar button next to fields requiring a date.
When you click this button, you will see the above graphic calendar overlay the screen you’re working on and it will be pointing to the current day’s date.
To change the year, either click the red up- and down-arrow keys, or you may physically type the year into the field titled YEAR.
To change the month, click the blue up- and down-arrow keys.
To select a date on the month you have selected, click on the date on the calendar’s date grid, then click the OK button to accept the date or click the date and press the ENTER key to accept it.
To close the graphic calendar without selecting a date, click the CANCEL button.
Inventory Types
Valid Inventory Types are:
S = State
R = Road Materials
F = Fuel
P = Parts
O = Operating Stock
C = Culverts
Sta = Do not use
Oth = Do not use
I = Miscellaneous or Inventory Adjustments
Entering New Account Numbers in the Posting Programs

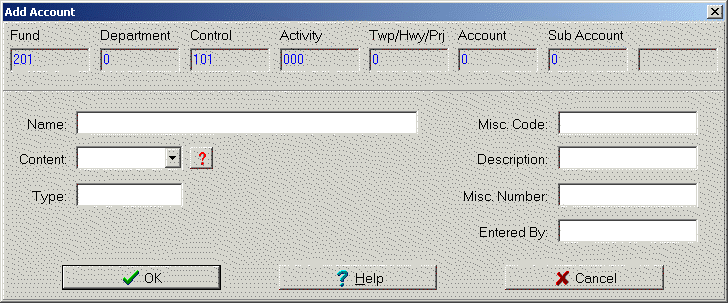
If while posting you enter an account number that does not exist, you will be shown the above screen where you may set the new account number up "on the fly."
Enter the new account’s Name and Type (Asset, Liability, Expense, Revenue, Equity, etc.). If this is a special purpose account number, select its content type from the Content drop-down list. If this is a State Trunkline account number, enter any Miscellaneous Code, Description, and/or Miscellaneous Number necessary to finish setting up the new account.

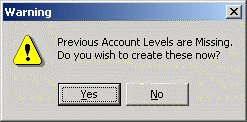
If the account number you’re setting is missing its beginning segments, you’ll be warned that the new account number is missing its previous levels and asked if you want to set them up. Click YES to do so. If you click NO, you’ll be informed that the missing levels must first be set up in order to enter the new account number.
REMEMBER: Each account number has a total of seven account segments and each progressive account segment must be set up for a new account number to "take." For example:
Level 1: FUND 201
Level 2: FUND+DEPT 201+0
Level 3: FUND+DEPT+CONTROL 201+0+450
Level 4: FUND+DEPT+CONTROL+ACTIVITY 201+0+450+451
Level 5: FUND+DEPT+CONTROL+ACTIVITY+TWP/HWY/PRJ 201+0+450+451+0
Level 6: FUND+DEPT+CONTROL+ACTIVITY+TWP/HWY/PRJ+ACCOUNT 201+0+450+451+0+0
All of the above levels would need to be set up before you could set up the new Level 7 portion of the account number (e.g., 201+0+450+451+0+0+0).
New Inventory Transaction Charge Type
There are currently four different Charge Types. They are:
•DEE Used for Direct Equipment Expense where parts are being charged directly to a specific piece of equipment.
•DFE Used for Direct Fuel Expense where fuel is being charged directly to a specific piece of equipment.
•ECO Used for Equipment Capital Outlay where enhancements are being added to a specific piece of equipment to make it "road ready."
•STI Used to charge out State Trunkline Inventory items for billing to the state for maintaining state roads.
Payroll Annual Pays
Enter the number of times the employee is paid per year as follows:
01 Paid annually
02 Paid semi-annually
04 Paid quarterly
12 Paid monthly
24 Paid twice monthly
26 Paid every two weeks
52 Paid weekly
Payroll Types Index
Assign a unique number to each payroll type you set up. For example:
1 Hourly
2 Salary
3 Overtime
4 Holiday
5 Sick
6 Vacation
7 Meetings
8 Election Worker
Note: If your data has been imported from BETA by one of our technicians, you should use the same PR Type Index that you had set up in Beta in the CFMAINT program (e.g., Title-1 is Regular, use a 1 for regular, Title-2 is Overtime, use a 2 for overtime, Title-3 is Sick, use a 3 for sick, etc.).
Payroll Post Totals Selection Box

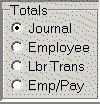
This box allows you to select how you want to see the journal totals. There are four options:
Journal Displays the totals for the entire journal including employee and equipment earnings
Employee Displays the totals for the selected employee and their equipment only
Lbr Trans Displays the totals for all labor transactions
Emp/Pay Displays the totals for the currently selected employee and equipment for the entire pay period
We suggest you start out by using the JOURNAL option.
Load Deductions to Calculate
You have three options for how you want to load your deduction codes. They are:
Load All Load all deduction types into the Deductions to Calculate grid
Load Group Load a saved grouping of deduction codes into the Deductions to Calculate grid; deductions not in the deduction group will be loaded into the Available Deductions grid
Load None Load all deduction types into the Available Deductions grid
Load Banks to Calculate
You have three options for how you want to load your bank codes. They are:
Load All Load all the banks in the Banks to Calculate grid
Load Group Load a saved grouping of banks into the Banks to Calculate grid; banks not in the bank group will be loaded into the Available Banks grid
Load None Load all the banks into the Available Banks grid
Open Journal-Borrow Journal Help
There are times when you may want to reuse an already existing Journal Number. To do this, click the open folder icon on the Open Journal screen to go to the Borrow Journal screen.
If you know the journal number you want to use, enter the number in the Journal Number field. If you don’t know the journal number, you can locate it in the journal number selection grid. There, you will see journal numbers and descriptions. Locate the journal number you want to use by highlighting its line and then click the OK button to return to the main Open Journal screen.
Save Journal Help
When you exit any of the posting programs, the Save Journal As dialog screen will appear. Depending on the type of posting you are doing, enter a description for this journal. This description will identify the journal you are committing and will make it easy to locate the journal in the future should you need to do so.
Click the OK button to accept the journal description. To cancel the committing of a journal, click the CANCEL button. This will return you to the main posting screen where you may continue making entries or correcting prior entries.