SETTINGS
DESCRIPTION: Settings is used to set up many of your preferences and settings for Pro Fund Accounting.
To access: Click on the Settings button ![]() at the bottom left corner of the main window.
at the bottom left corner of the main window.
The following window will appear:
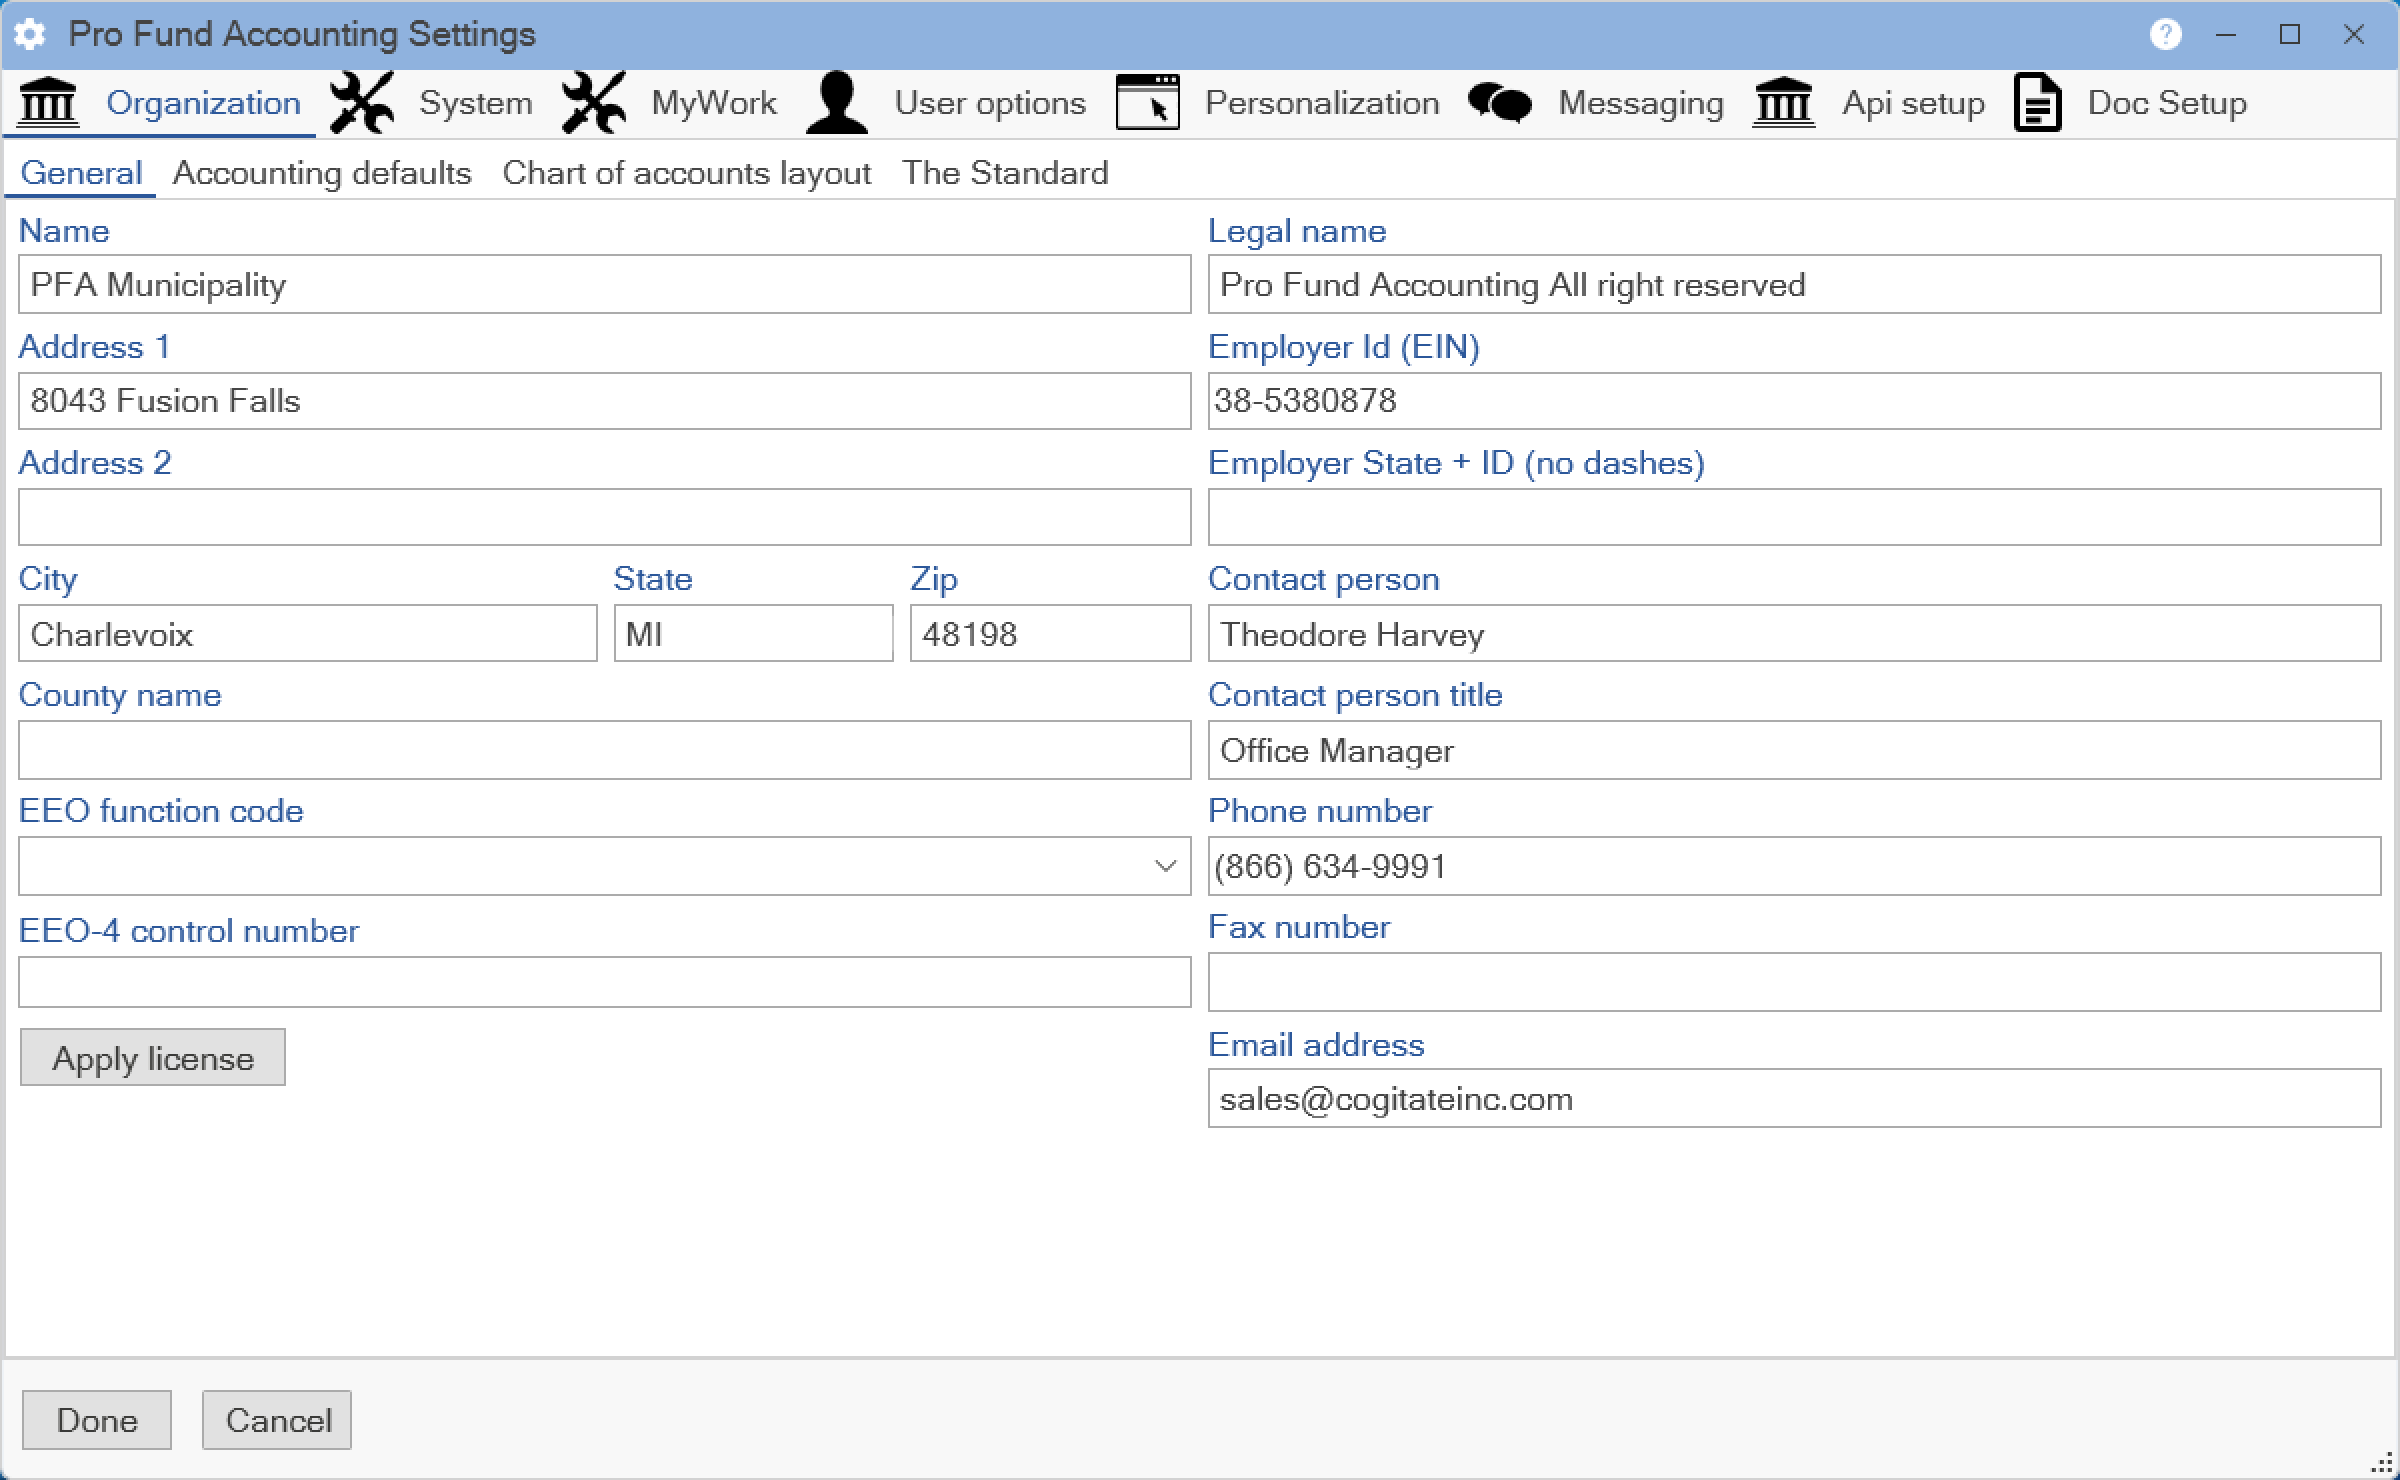
The Organization Tab is used to set up the default information for your company. Under the Organization Tab are the General, Accounting defaults, and the Chart of accounts layout Tabs.
The General Tab is used to enter in the general information about your company, as shown in the above image. Click on the Apply license button to enter in the activation code for Pro Fund Accounting.
When finished making changes to any of these options, click the Done button to save them and return to the main window. Click the Cancel button to return to the main window without saving any changes that might have been made.
The Accounting defaults Tab is used to set your fiscal year start date and the default overtime payroll type.
The following window will appear:
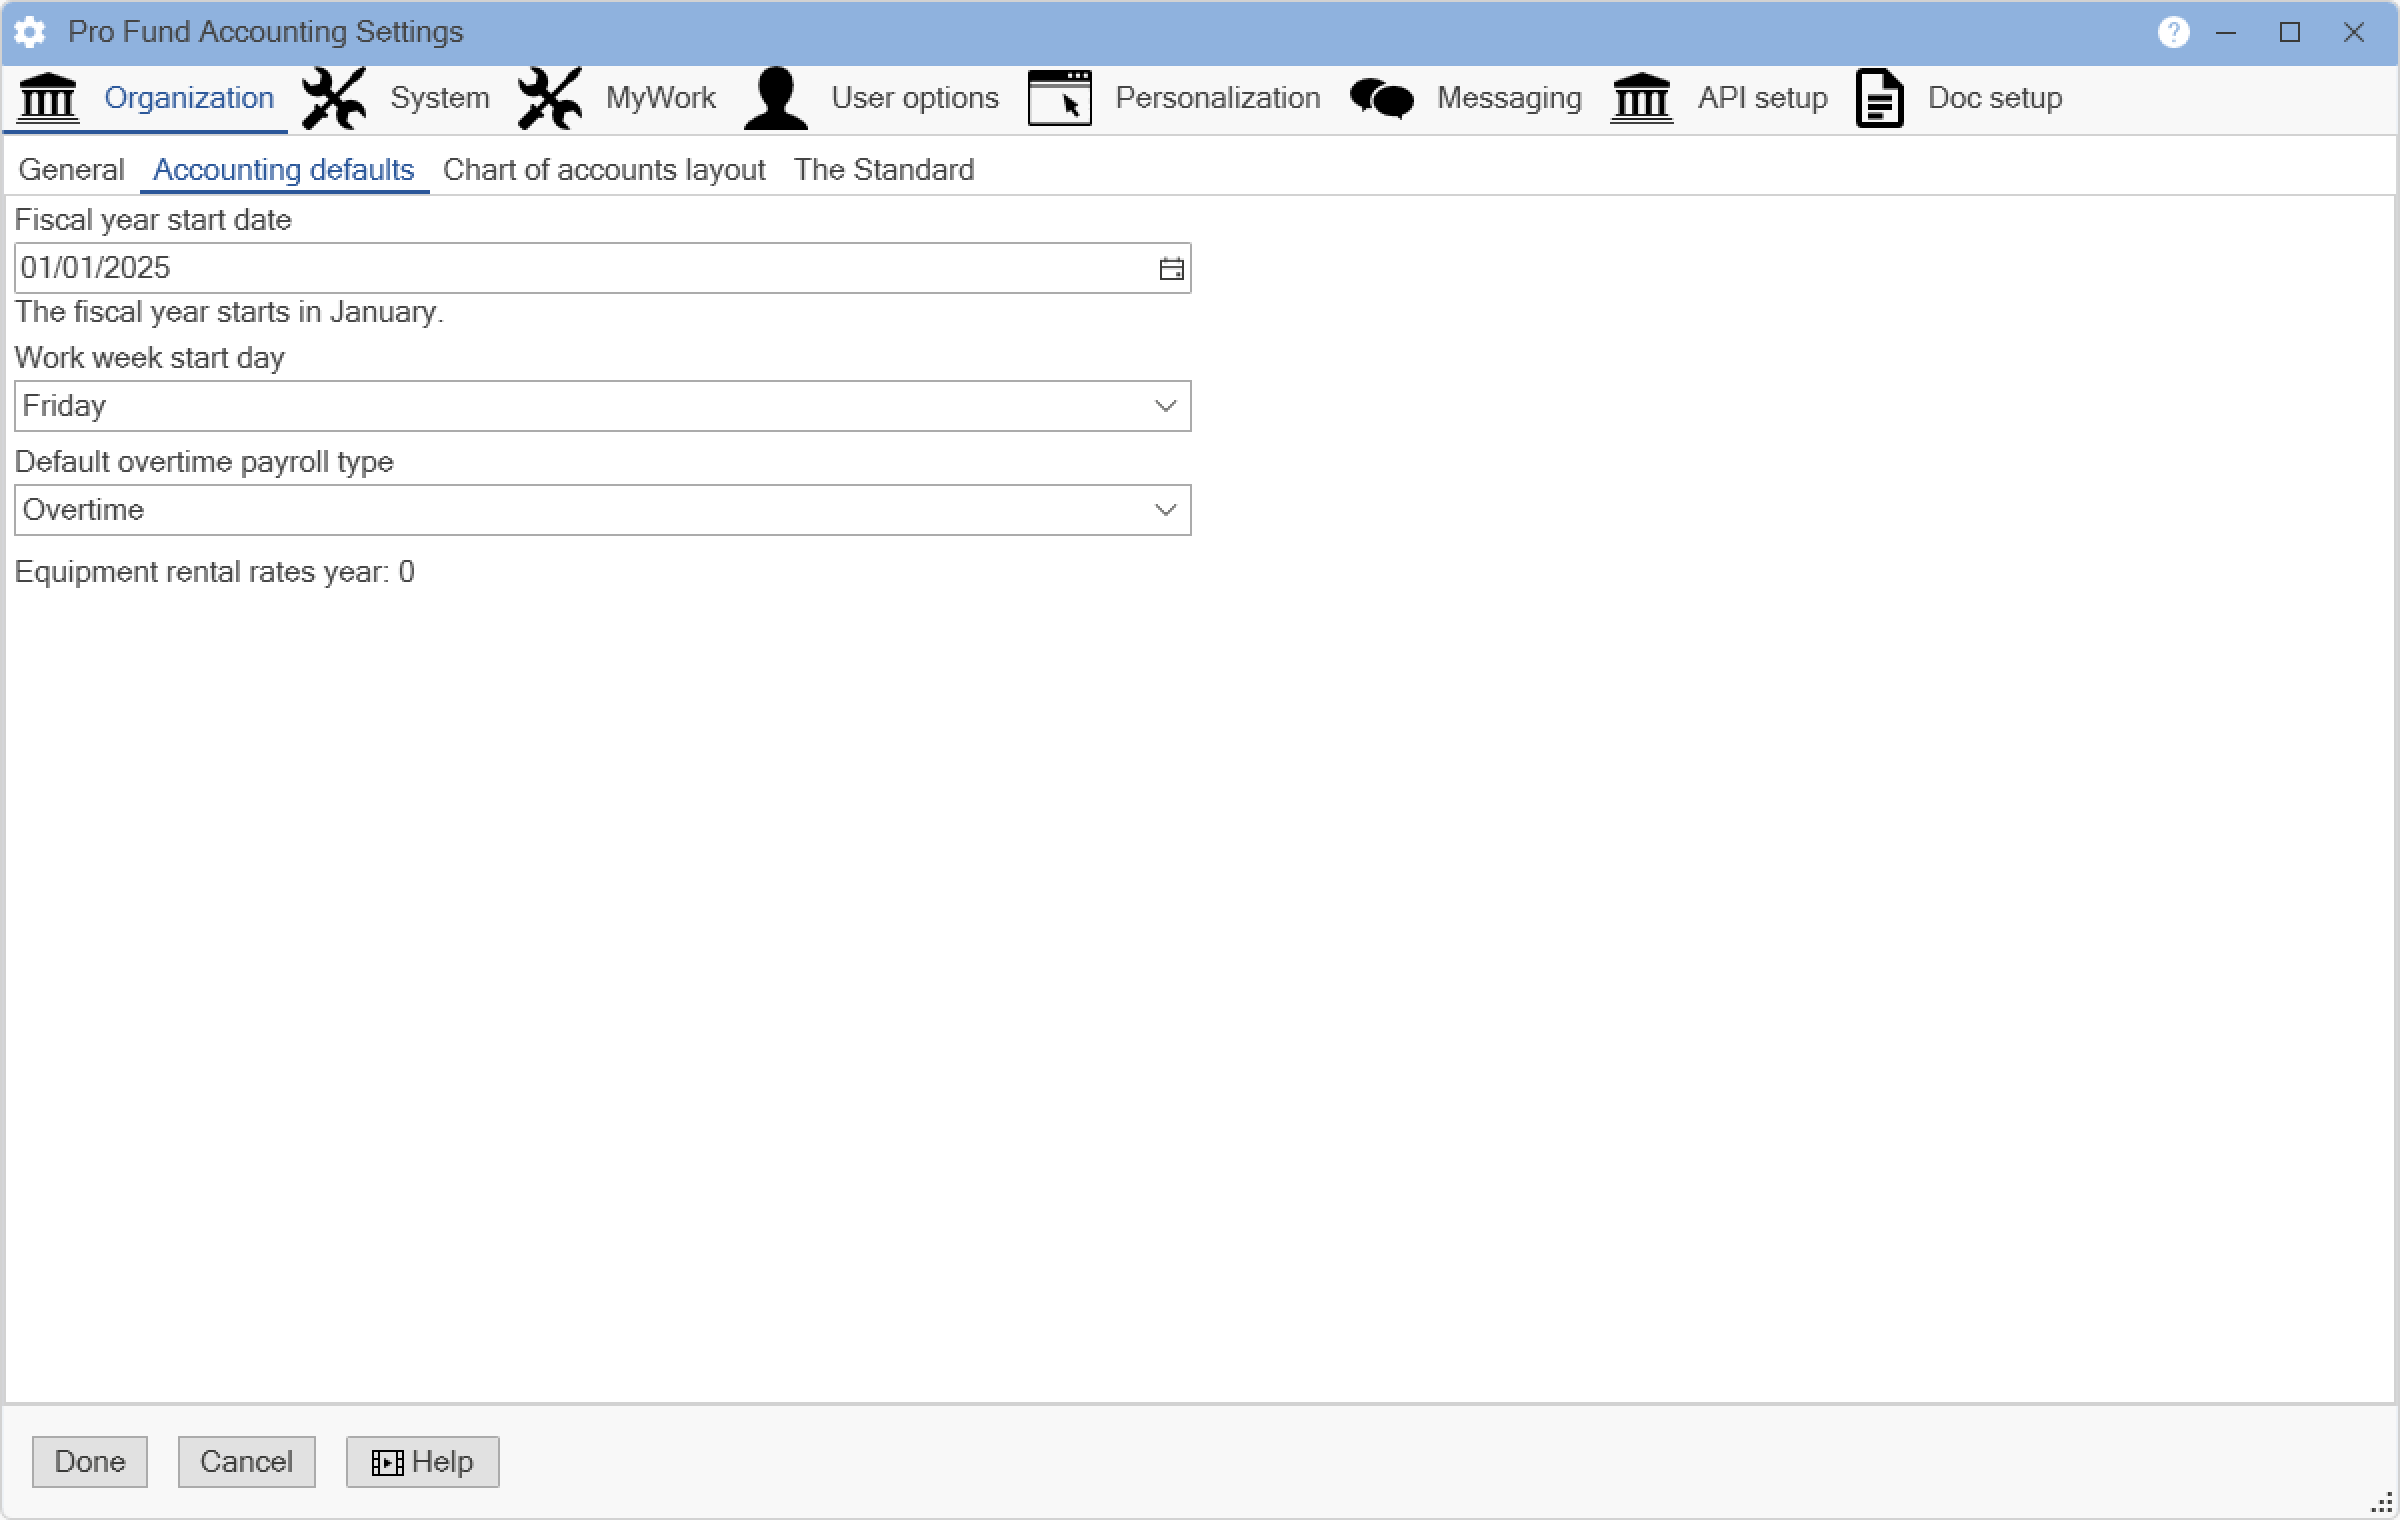
Set the Fiscal year start date by either typing in the date or by using the Calendar button. Set the Default overtime payroll type by using the drop down list. Enter the Work week start day by using the drop down list. The Equipment rental rates year displays the year that your state rental rates/codes are updated through.
When finished making changes to any of these options, click the Done button to save them and return to the main window. Click the Cancel button to return to the main window without saving any changes that might have been made.
The Chart of accounts layout Tab is used to set up your account structure.
The following window will appear:
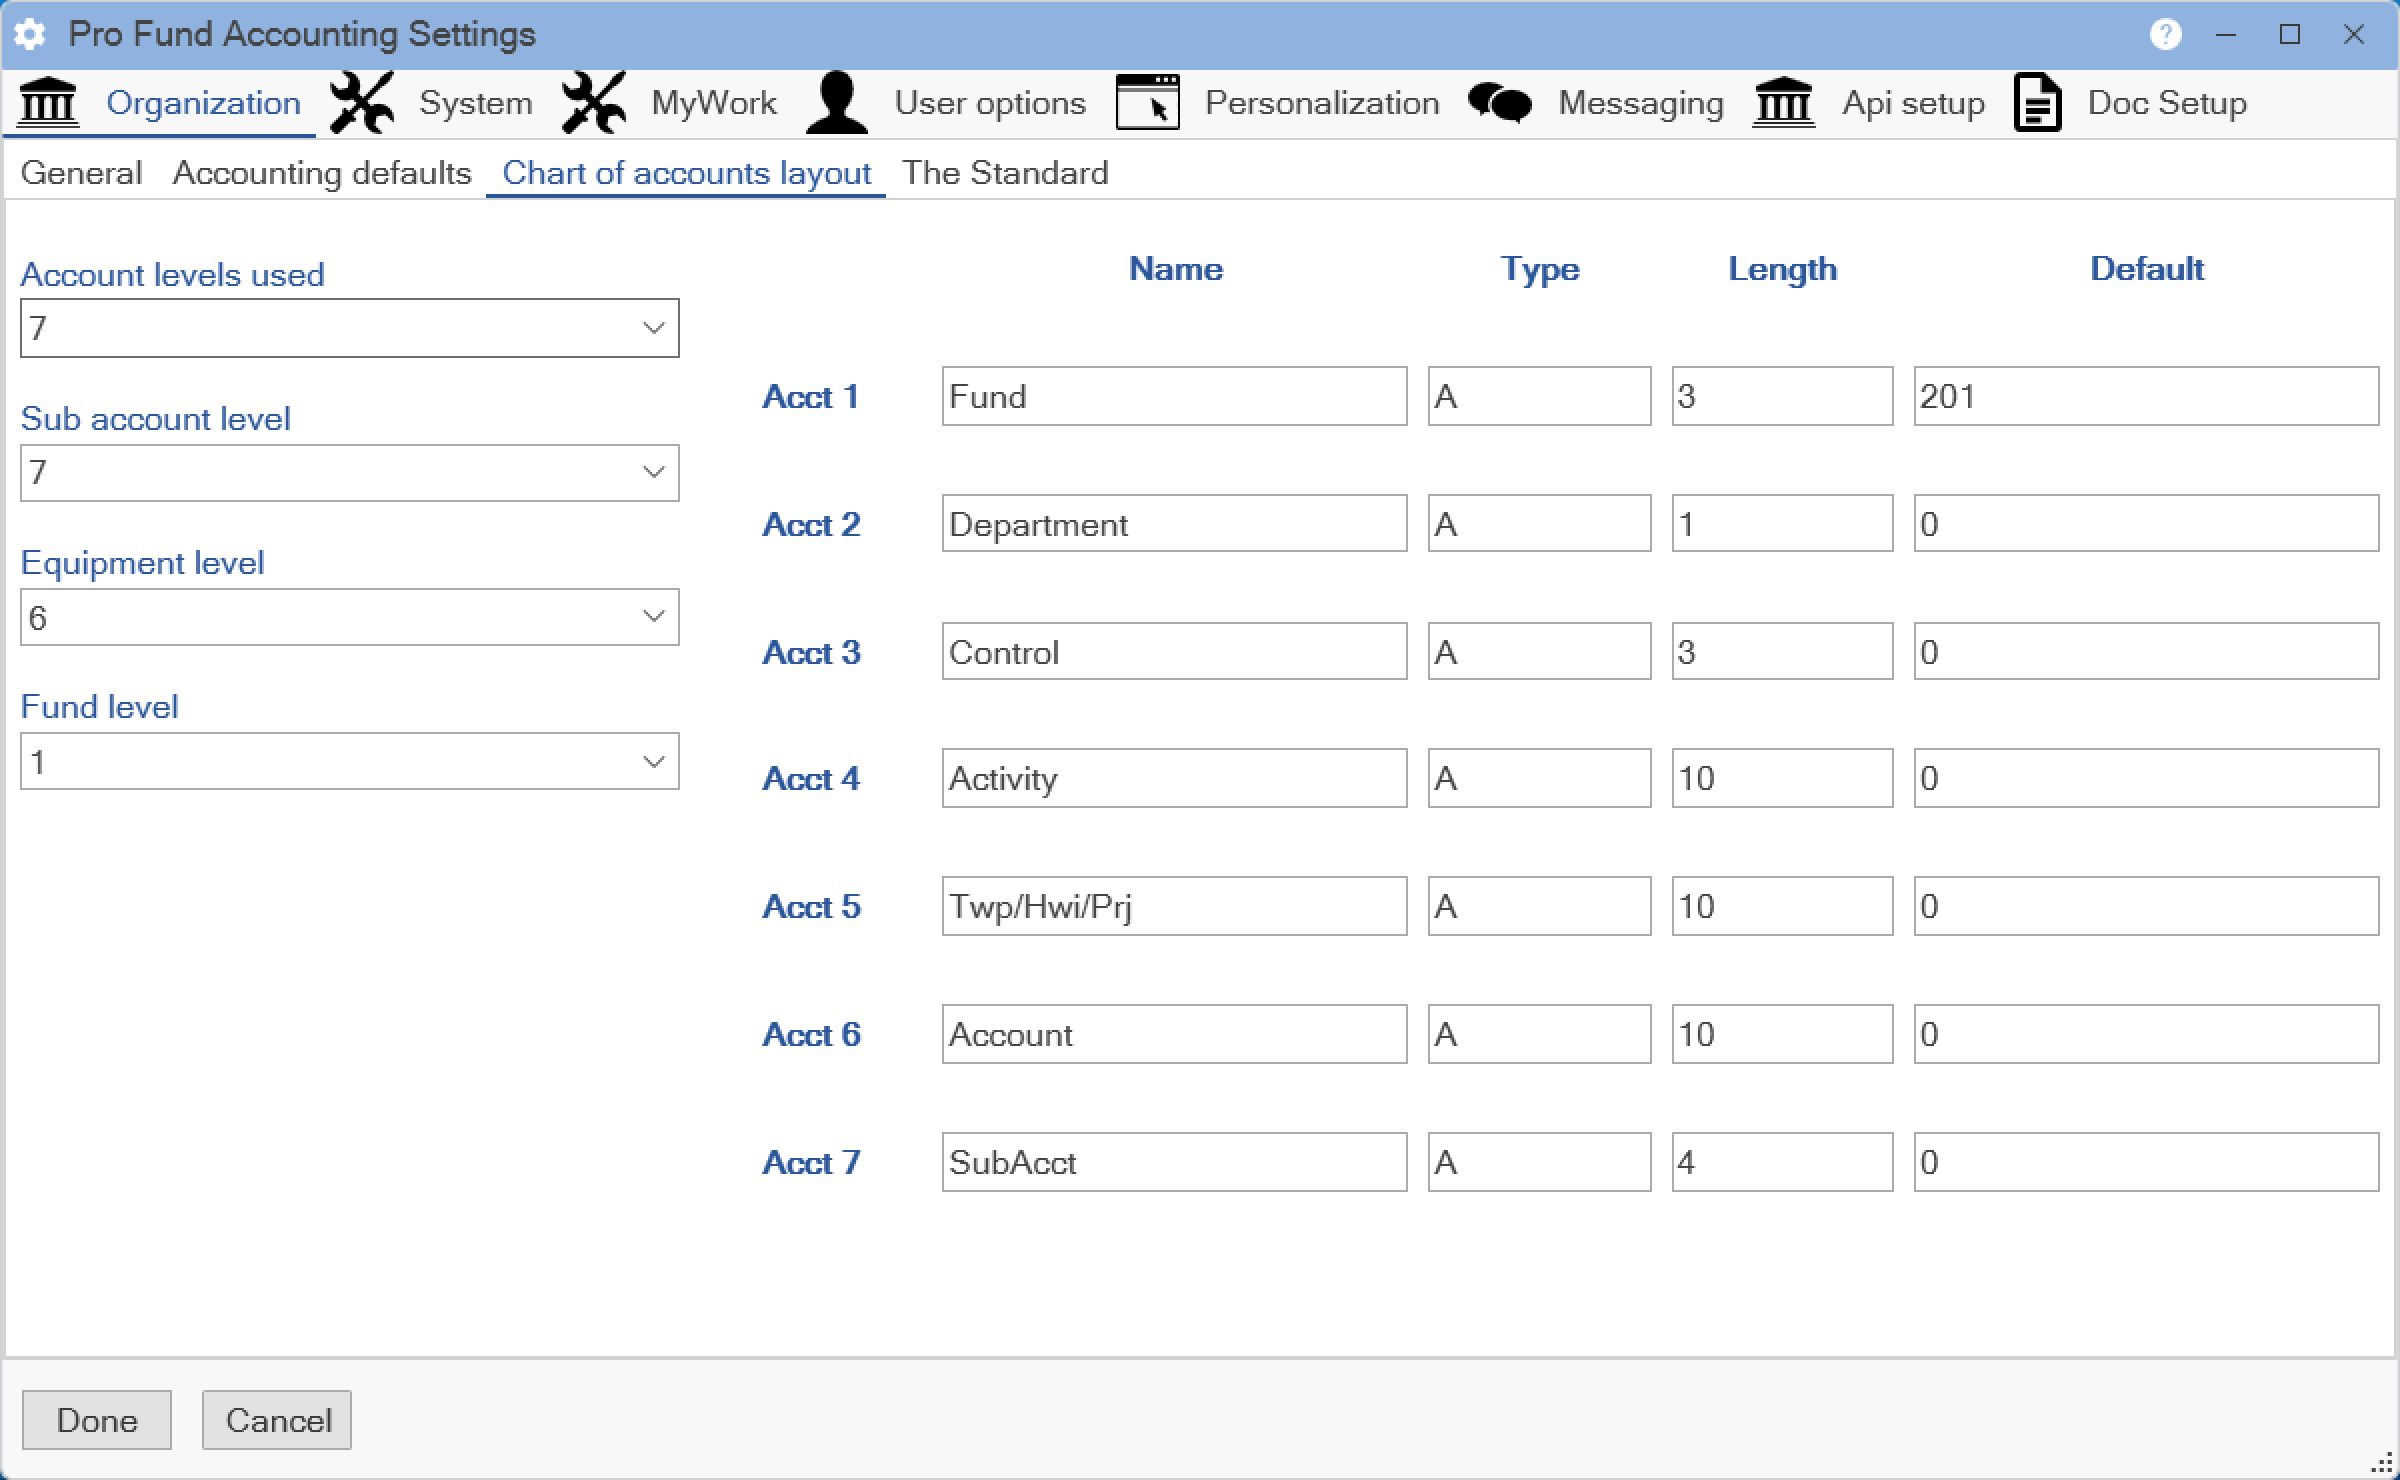
Road Commissions typically have 7 levels for their account structure; Townships typically have 3-5. If you choose the Account levels used to be 4, then only 4 would show on the right-hand side. You would then need to update your Sub account level, Equipment level, and Fund level.
When finished making changes to any of these options, click the Done button to save them and return to the main window. Click the Cancel button to return to the main window without saving any changes that might have been made.
The System Tab allows you to set certain preferences throughout Pro Fund Accounting.
The following window will appear:
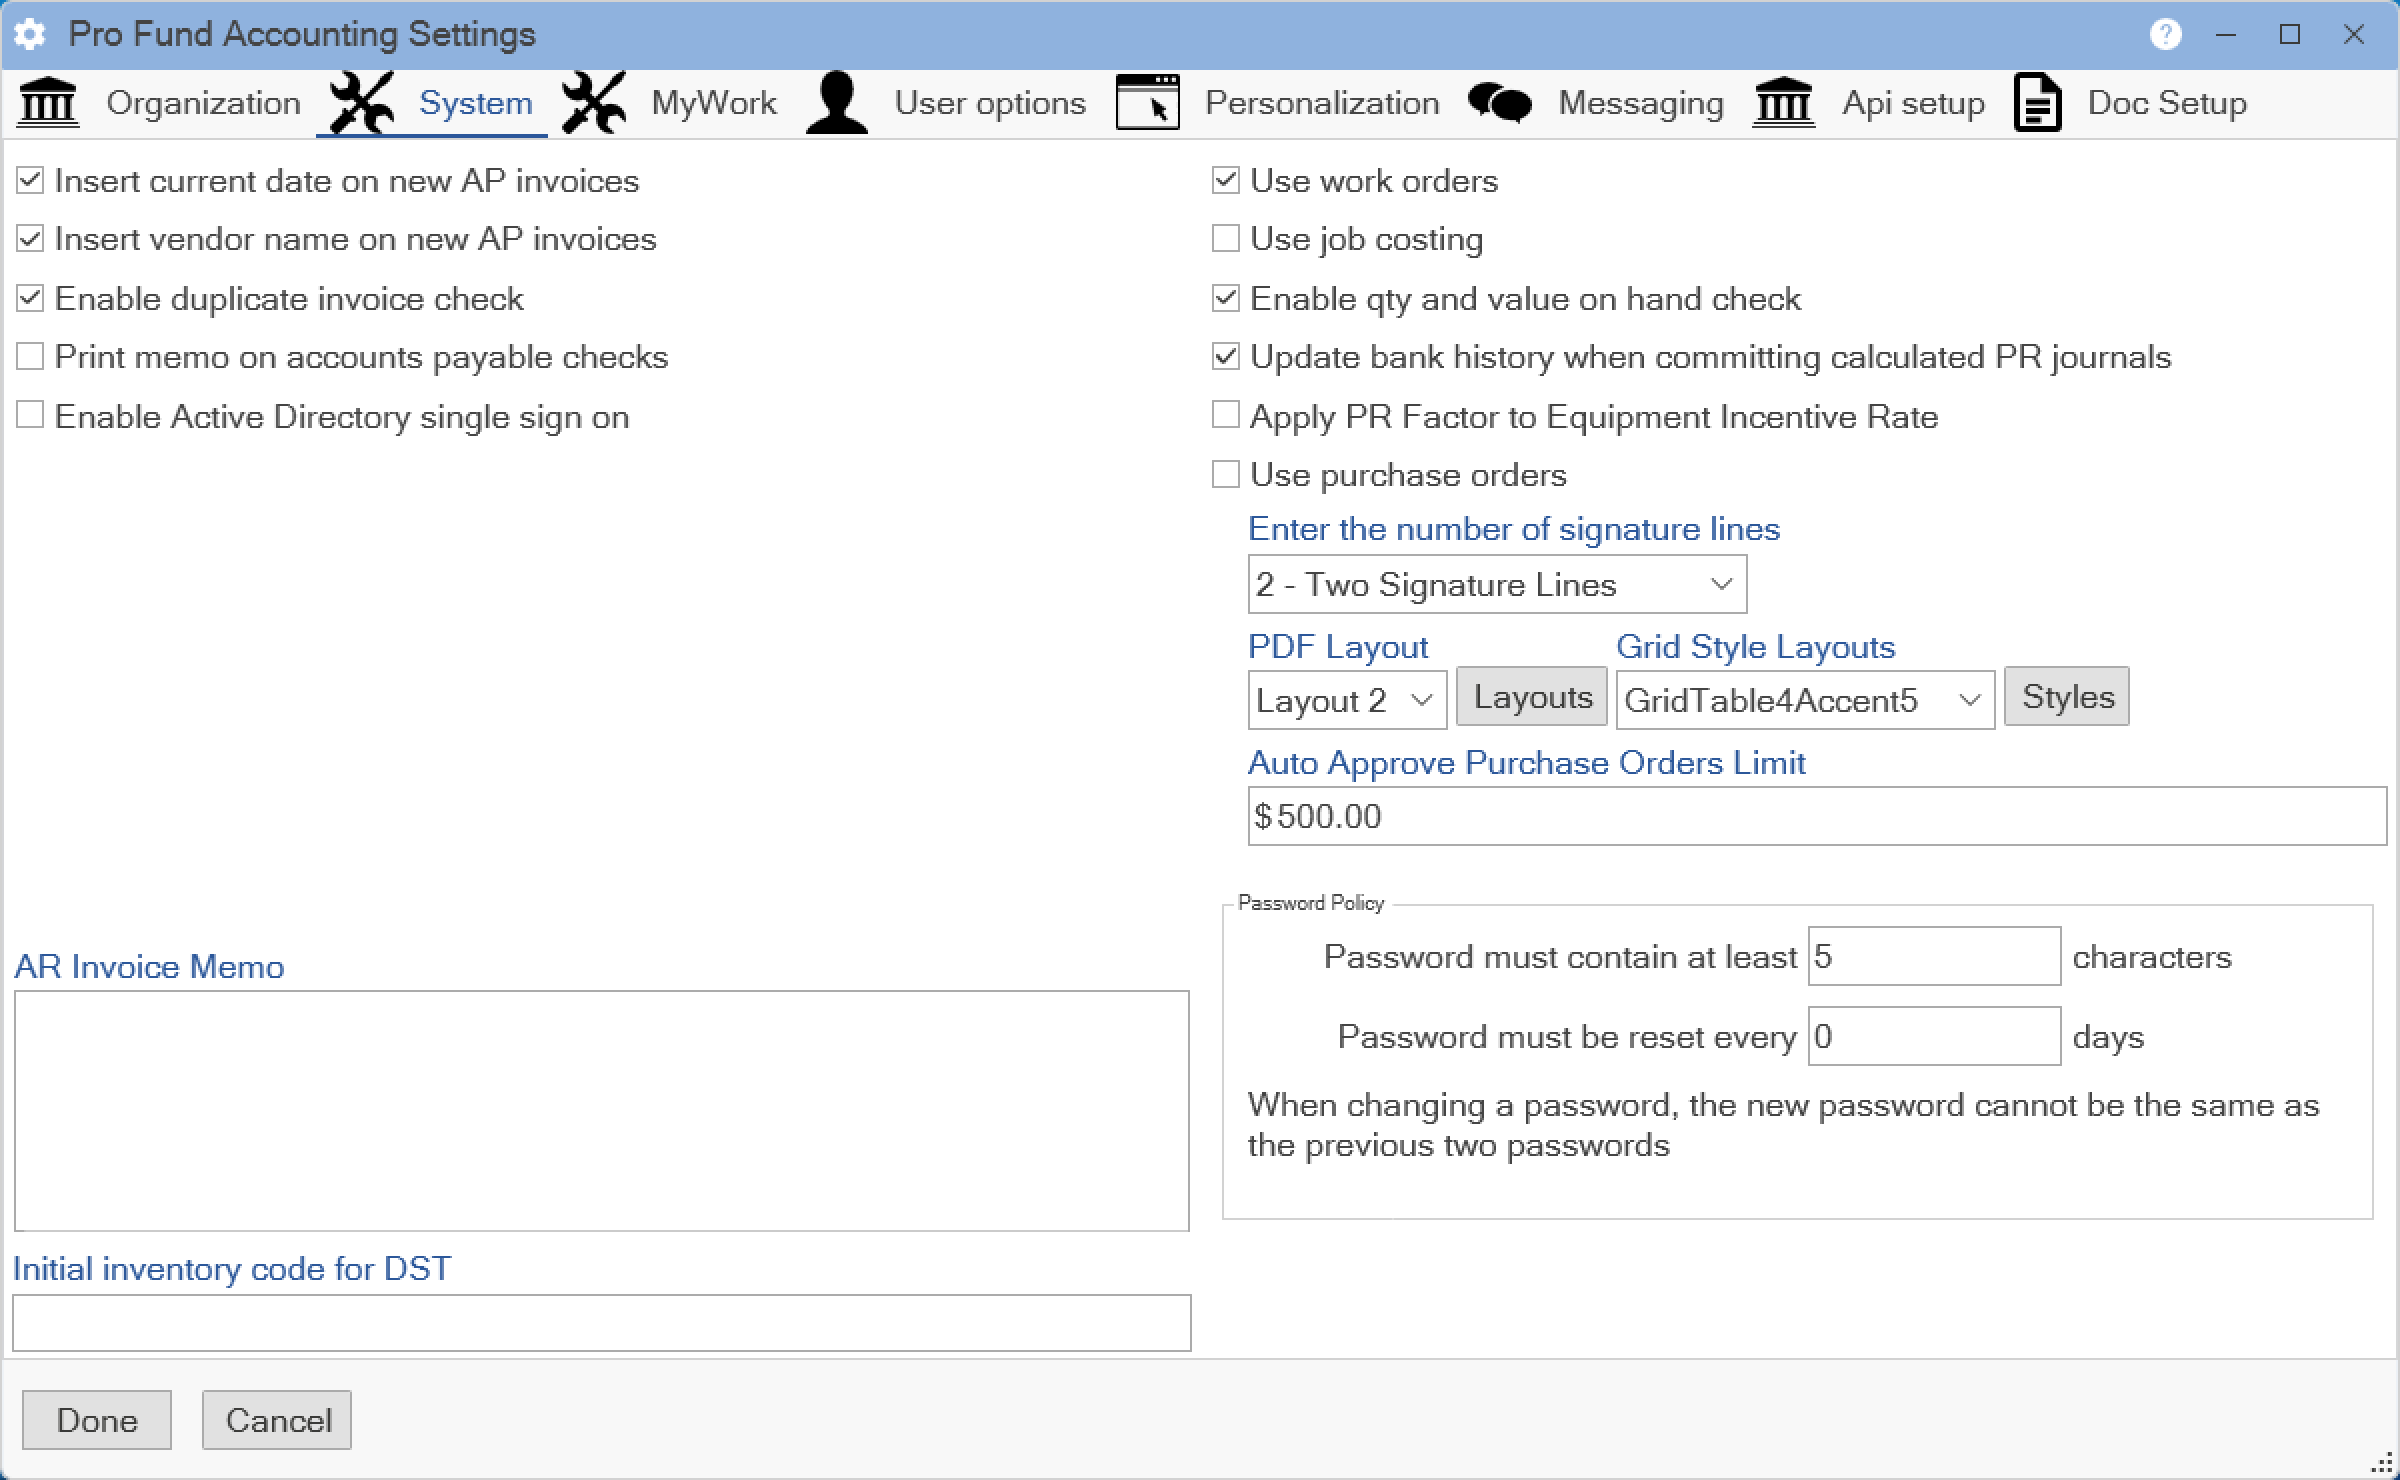
The following is an explanation of the options available:
Insert current date on new AP invoices - Checking this box will cause the AP Post menu item to automatically insert the current date on new invoices being posted. If you want to properly age invoices for net and discount purposes, then you should not check this box. This will cause the AP Post menu item to ask the user for an invoice date for each new invoice that is entered.
Insert vendor name on new AP invoices - Checking this box will cause the AP Post menu item to automatically enter the last vendor posted to for each new invoice. If you want to enter the vendor's name or code every time you post a new invoice, then do not check this box.
Enable duplicate invoice check - Checking this box will cause the AP Post menu item to check to see if the invoice number being entered has been posted for this vendor before.
Print memo on accounts payable checks - Checking this box will cause the AP check menu item to print the information in the Memo field that was entered during AP Post on the vendor check stub. If you do not wish the Memo field to print, then do not check this box.
Enable Active Directory single sign on - This option relates to the Pro Fund Accounting login process. If your organization has an Active Directory domain set up, then checking this box will allow Pro Fund Accounting to automatically login users based on their Windows credentials if the user is mapped properly in the Security program. This does not apply if your organization does not have an Active Directory domain set up.
Use work orders - This option relates to the Inventory Post, AP Post, and Payroll Post menu items and controls whether you need to enter work order numbers for various job functions performed, inventory items moved or used, or equipment repairs. If you do not use work order numbers, then leave this box unchecked. Checking this box means that you are also using the Work Order Calc menu item and information posting using Inventory Post, AP Post, and Payroll Post will relate to an associated, valid work order number generated in the Work Order Calc menu item.
Use job costing - This option relates to the Inventory Post, AP Post, and Payroll Post menu items and controls whether you need to enter Job Types and Quantities. If you want to use Job Costing, then check this box.
Enable qty and value on hand check - This option relates to the Inventory Post menu item and controls whether or not the displayed quantity and value fields automatically update as inventory is being posted.
Update bank history when committing calculated PR journals - Checking this box will cause the Payroll Post menu item to recalculate the payroll bank information (e.g. vacation, sick, etc.) when changes are made to a payroll journal. If this box is not checked, then the Payroll Post menu item will not recalculate the payroll bank information.
Apply PR Factor to Equipment Incentive Rate - If a piece of equipment has an incentive rate associated with it and the pay type has a PR factor other than 1 (e.g. overtime) and this box is checked then Pro Fund Accounting will include the incentive rate when multiplying by the factor.
Use purchase orders - This option relates to the AP Post menu item and determines if you need to enter purchase order numbers for the invoices you are posting. If you do not use purchase orders, then leave this box unchecked. If you check this box, that means you are also using the Purchase Order Calc menu item and invoices entered in AP Post will have had an associated, valid purchase order number generated in the Purchase Order Calc menu item. This option also allows you to select, by using the drop down lists, the number of signature lines, the PDF Layout, and the Grid Style Layouts.
Auto Approve Purchase Orders Limit - Any purchase order generated by the Restock Inventory Calc menu item that has an amount equal to or less than the approved limit will automatically be approved.
AR Invoice Memo - The information in this field will be used when printing the invoices from the customer's invoice post.
Initial inventory code for DST - When posting Payables, if you select an inventory account (109 or 110 at the fourth level), then Pro Fund Accounting will default the inventory code to the one specified here. If you do not wish to have a default inventory code specified, then leave this field blank.
Password Policy - This is your company's policy on the length of the password required and how often it needs to be changed. This is a system-wide policy, not set for each individual. Characters: Enter the minimum number of characters that a person must use for their password. Days: Enter the number of days that a password must be reset. When changing a password, the new password cannot be the same as the previous two passwords.
When finished making changes to any of the options explained above, click the Done button to save them and return to the main window. Click the Cancel button to return to the main window without saving any changes that might have been made.
The MyWork Tab allows you to set certain preferences for the MyWork Timecard System.
The following window will appear:
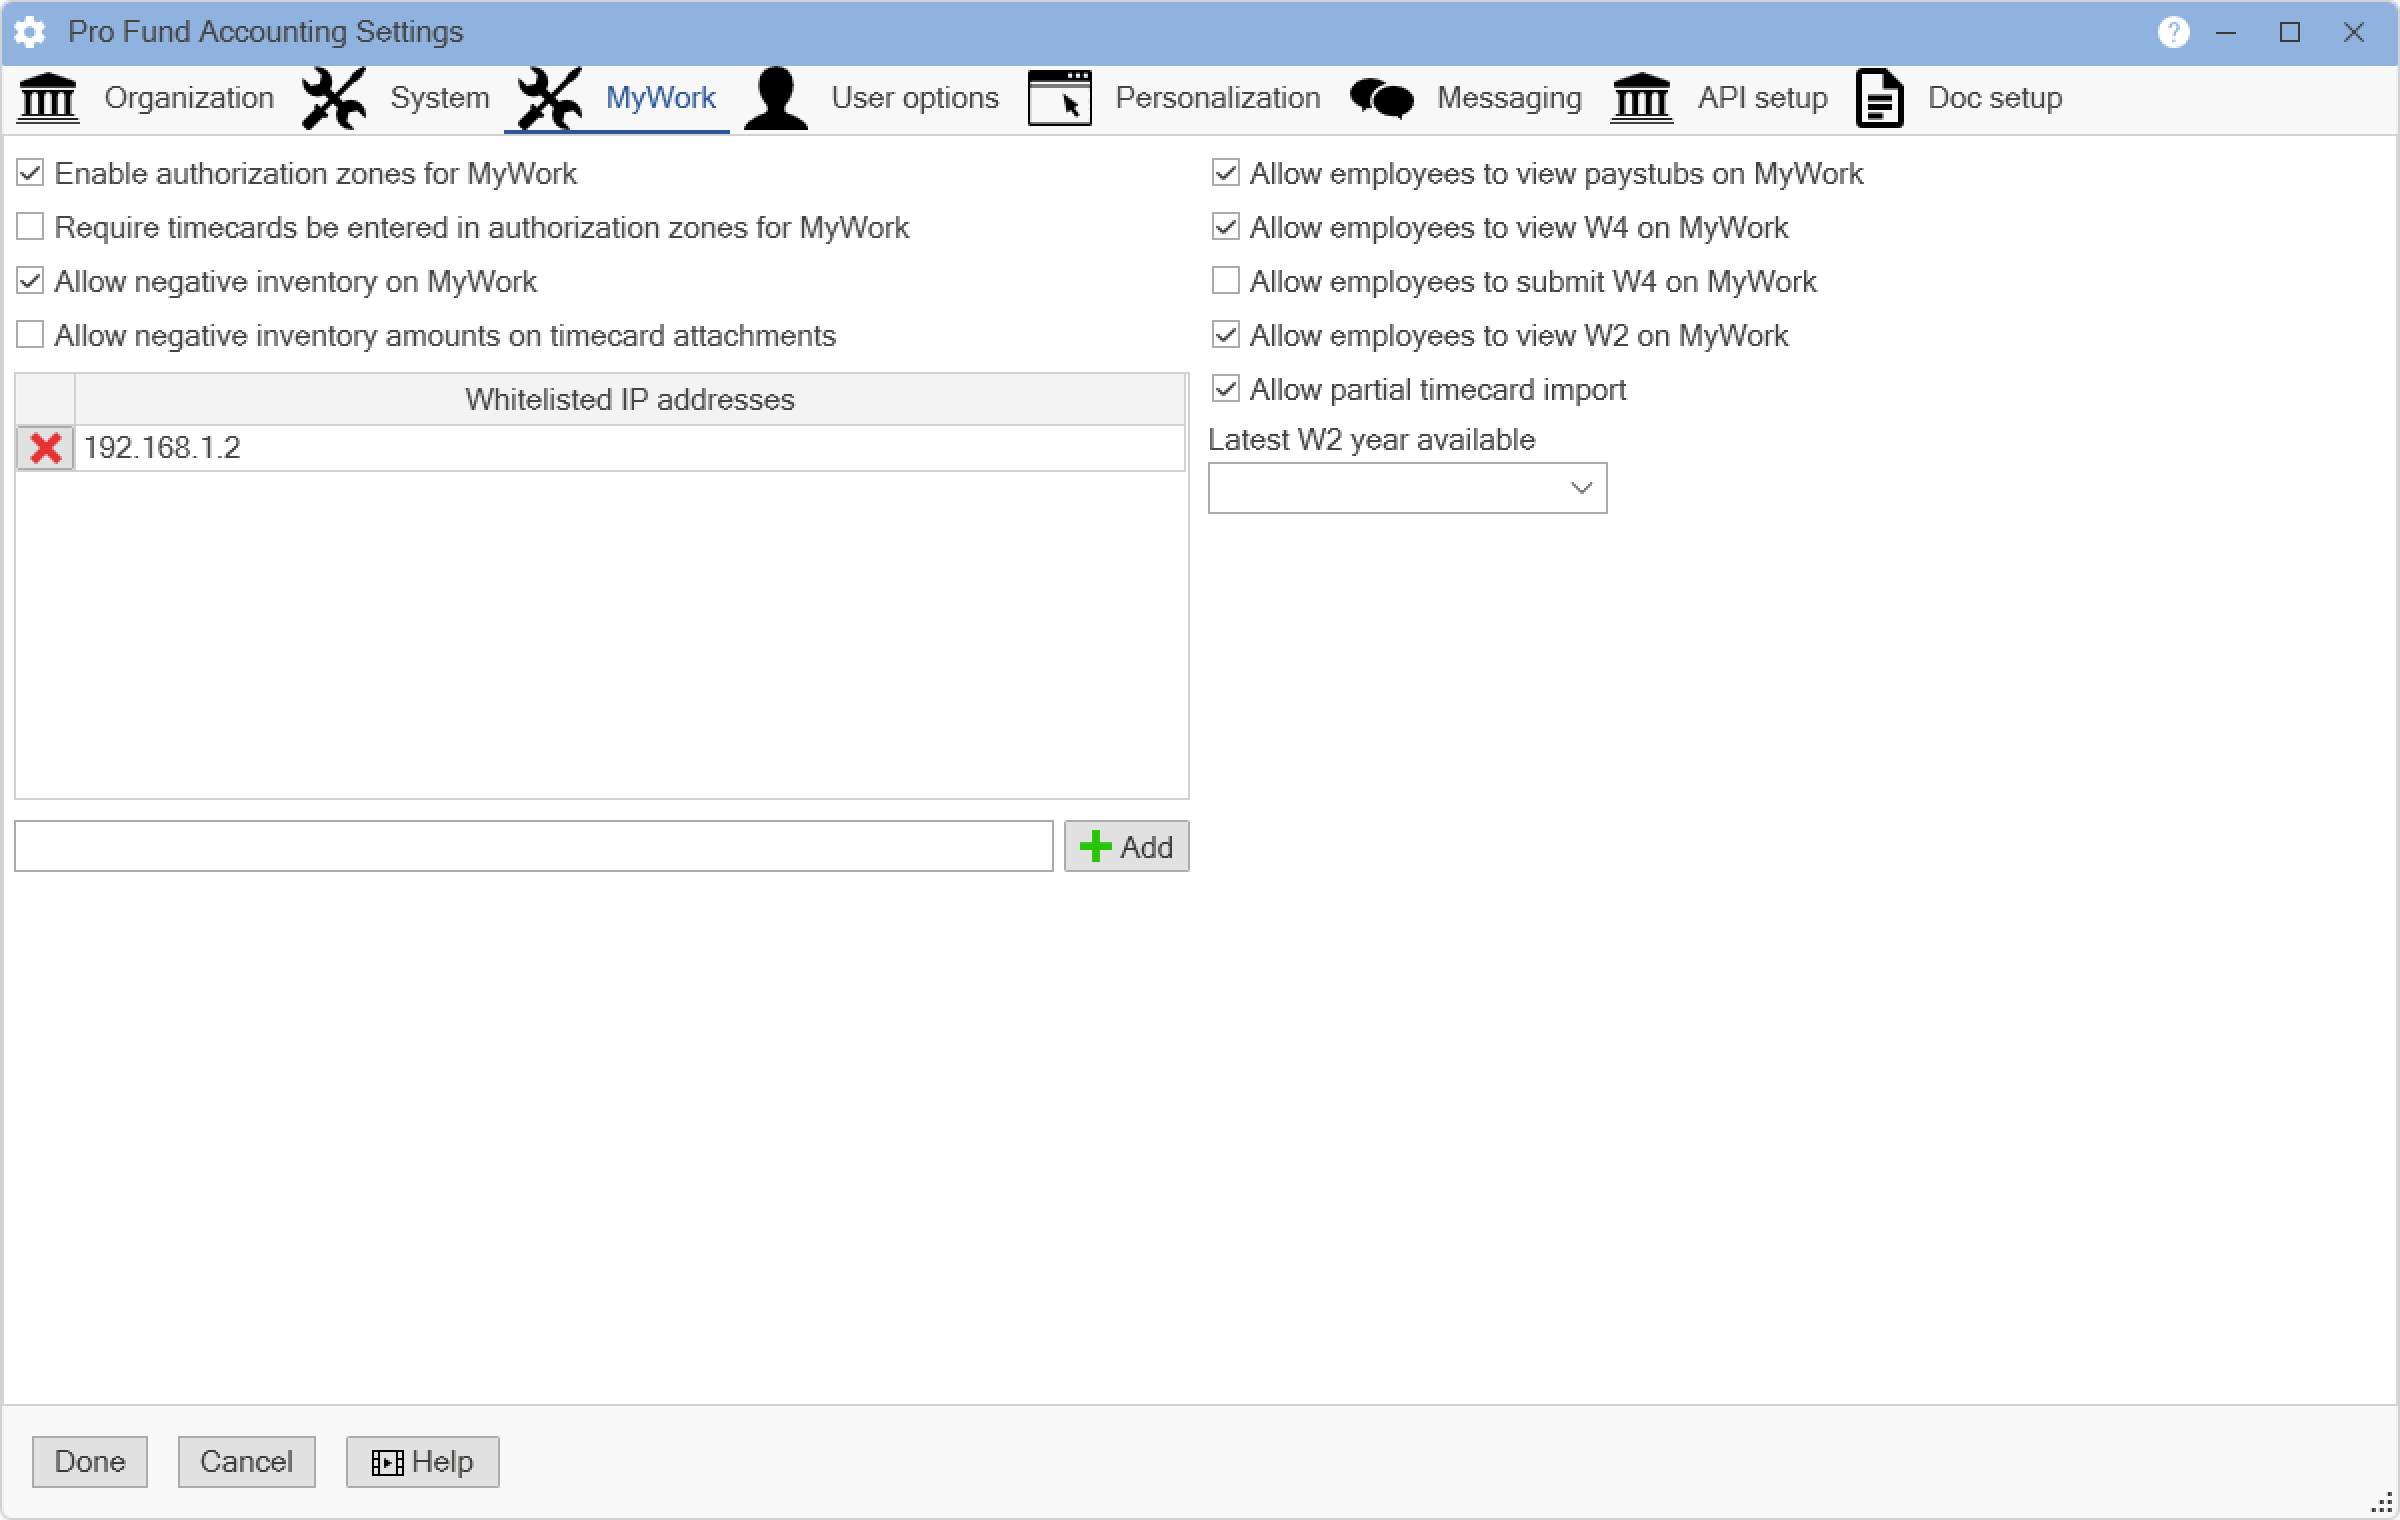
Check the boxes next to all of the options that apply to your company. Whitelisted IP Addresses are the addresses that will be permitted to post anywhere, thus bypassing the geo-fencing in MyWork. To enter in a Whitelisted IP Address, enter the address into the field below the Whitelisted IP Addresses box, then click the Add button. To delete an address, click on the X next to the address to be deleted.
When finished making changes to any of these options, click the Done button to save them and return to the main window. Click the Cancel button to return to the main window without saving any changes that might have been made.
The User options Tab allows you to set certain preferences for the current user.
The following window will appear:
.png)
To change your password, click the Change Password button. An Update password window will appear. Enter your Existing (current) password first, then enter a New password and Confirm new password. Once you have entered these three items, click on the Update Password button. If you do not want to update it, click on the Cancel button. A confirmation window will appear. Click Yes to continue and cancel changing your password, or click No to go back to changing your password.
Use the box edit mode for accounts - This option relates to how your window will look when you post/edit account numbers. If this box is checked, you can enter the account numbers, but you also have the option for the drop down list in case you forgot what an account number is, which will allow you to see all of the account numbers, as shown in the following image.
.png)
If the box is not checked, then you will not be able to use the drop down list to see the account numbers. The following image will appear instead:
.png)
Use account number delimiter - This option relates to how you manually enter account numbers (instead of using the drop down list). When this box is checked, you will then need to select the type of delimiter you want to use, such as + or -. To select the type of delimiter, click in the Enter delimiter character field. This character will be used to separate the levels of your account numbers (Example with delimiter: 201+0+515+515+727+0). If this box is not checked, then your account numbers will all be together and the Enter delimiter character field will be grayed out (Example without delimiter: 20105155157270).
Display confirmation on close - Checking this box will cause a confirmation window to appear when you go to exit out of Pro Fund Accounting. If this box is not checked, then Pro Fund Accounting will close when you choose to exit and not show the confirmation window. The confirmation window states that Pro Fund Accounting will now exit to apply your preferences. Click OK to continue.
Auto send alert on new call log ticket items - This option is used to let those selected as a Call Log Resolver (located under the Payroll module and the Employees menu item and the Employment Tab, there is a Call Log Resolver check box) that they have a new call log ticket in queue. When this box is checked, Pro Fund Accounting will let the Call Log Resolver know a new ticket is in the Call Log System. If this box is not checked, then Pro Fund Accounting will not advise the Call Log Resolver and they will have to manually check to see if there are any tickets out there for them to process.
Show active accounts only - Checking this box will cause Pro Fund Accounting to show only the accounts marked as Active whenever presented with the list of accounts.
Show group tree on all reports - Checking this box will show the group tree in the Report window when running a report. If this box is not checked, then the group tree will be hidden in the Report window.
Hide report parameters - This option pertains to the parameters that print at the end of any report. The parameters will tell you exactly how you answered each question in the Report window. There are times when it is important to know what parameters you picked to run a report, but there are other times when you are always running the same report the same way and you do not need to know this information. Check this box if you want to see the report parameters at the end of every report you print. If you do not want to see the report parameters, then do not check this box.
Display confirmation before every cancel - Checking this box will cause Pro Fund Accounting to have a confirmation window appear each time you click the Cancel button; then you will need to choose Yes or No to completely cancel (or not cancel). If this box is not checked, then Pro Fund Accounting will cancel the task at hand and NOT give you a confirmation window.
Display confirmation before every delete - Checking this box will cause Pro Fund Accounting to have a confirmation window appear each time you Delete an item/entry; then you will need to choose Yes or No to completely delete (or not delete) the entry. If this box is not checked, then Pro Fund Accounting will delete the item/entry at hand and NOT give you a confirmation window (or one more chance to change your mind).
Use online help - Check this box if you are going to use online help.
Account search options - This area relates to the way Pro Fund Accounting will search for account numbers. The options are:
Do not search - Pro Fund Accounting will accept any account number you enter; however, if the account number does not exist in you account number file, when you click the Save button, Pro Fund Accounting will stop and tell you the account number is not set up and you will need to enter the necessary information to set it up before the current transaction is saved and before you can continue posting or setting up new records.
Start with first segment - Pro Fund Accounting will attempt to locate the account number you enter starting with the first segment. It it cannot be located, then Pro Fund Accounting will stop and tell you the account number is not set up and you will need to enter the necessary information to set it up before you can continue posting or setting up new records.
Start with last segment - Pro Fund Accounting will attempt to locate the account number you enter starting with the last segment. If it cannot be located, then Pro Fund Accounting will stop and tell you the account number is not set up and you will need to enter the necessary information to set it up before you can continue posting or setting up new records.
Use first and last segment - Pro Fund Accounting will attempt to locate the account number you enter starting with the first segment. If it cannot be located, then Pro Fund Accounting will attempt to locate the account number starting with the last segment. If it still cannot be located, then Pro Fund Accounting will stop and tell you the account number is not set up and you will need to enter the necessary information to set it up before you can continue posting or setting up new records.
Start with specific segment - Selecting this option will tell Pro Fund Accounting which level of your account number you wish to start searching. The default is the first level (1). Use the drop down list to select the level number you want to use.
In the Confirmation Messages section, check the boxes if you desire to see a confirmation message window before you cancel, delete, or save for any of the listed windows in Pro Fund Accounting. If you do not desire to see the confirmation window, then leave the check box unchecked.
When finished making changes to any of these options, click the Done button to save them and return to the main window. Click the Cancel button to return to the main window without saving any changes that might have been made.
The Personalization Tab allows you to set certain preferences for the current user.
The following window will appear:
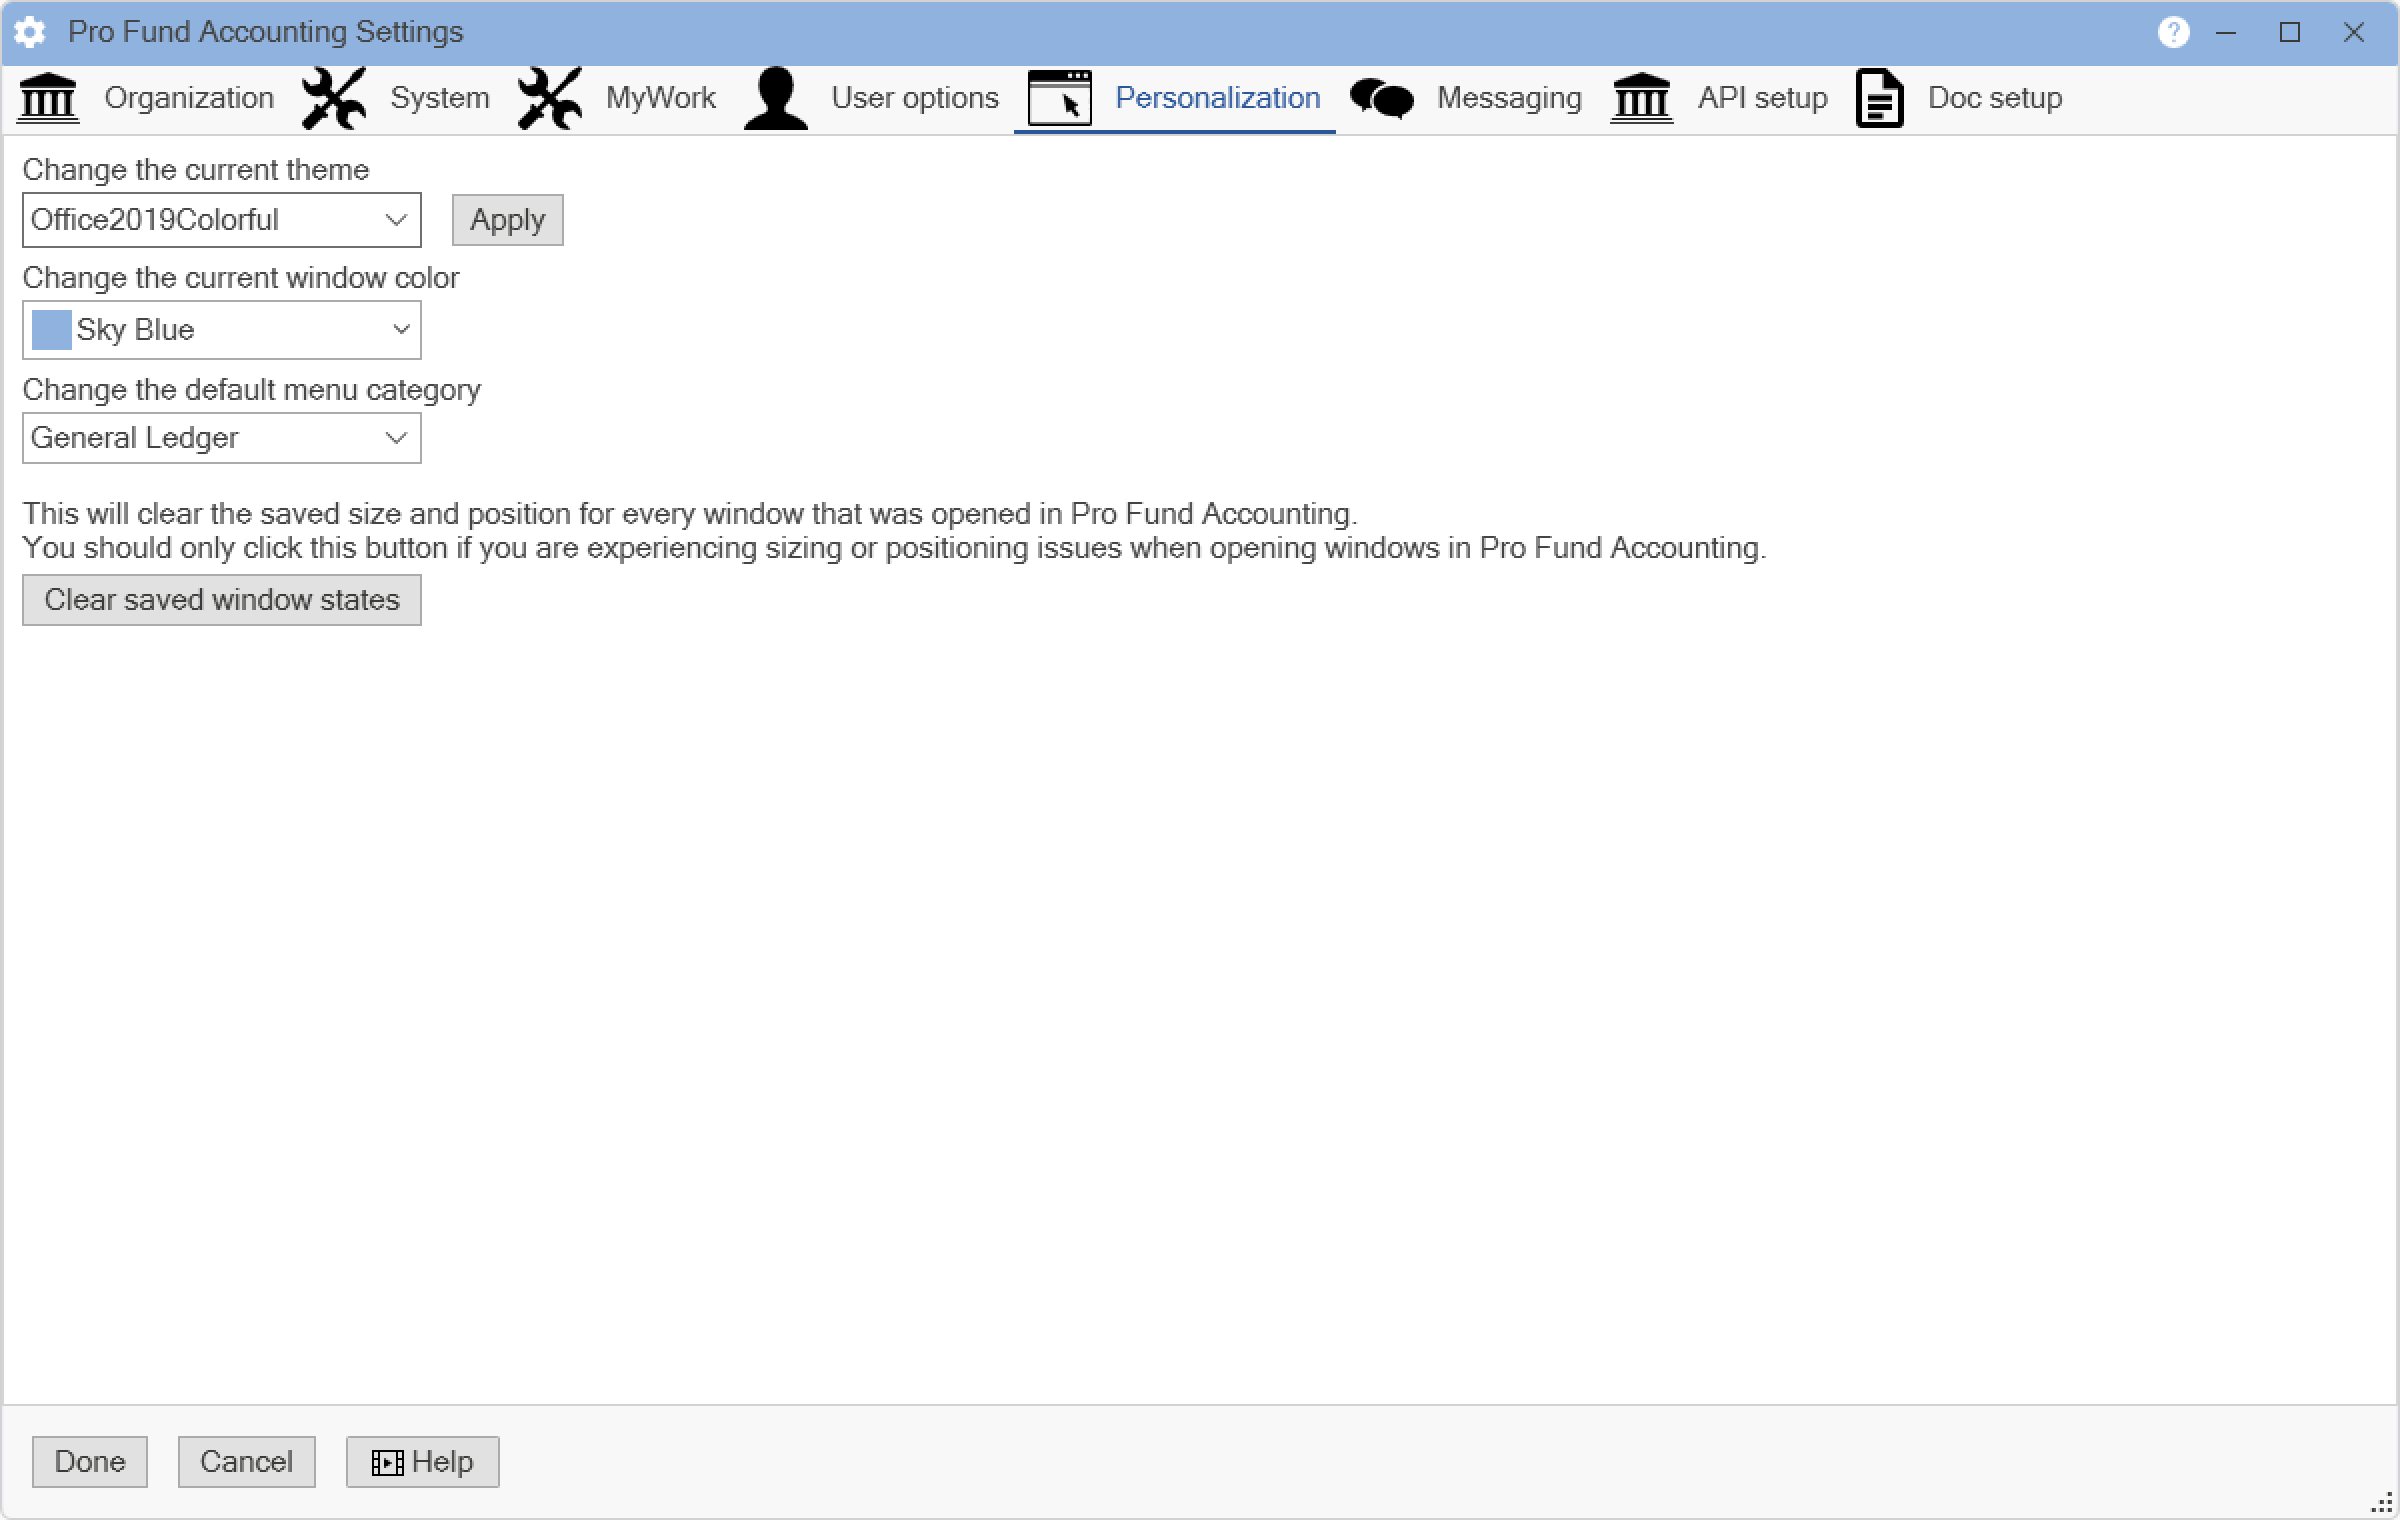
Change the current theme - Using the drop down list, you can change the color theme for Pro Fund Accounting. Click the Preview button to see what the chosen option looks like.
Change the current window color - Using the drop down list, you can change the color theme for the bars at the top, known as the window colors.
Change the default menu category - Using the drop down list, you can change the module that Pro Fund Accounting will default to when you first login. This option is handy for someone like a Payroll Clerk who always goes into the Payroll first. They would want to make their default the Payroll module. Or perhaps you have put all the menu items you use in your Favorites module, then you would want Pro Fund Accounting to default to the Favorites module first when you login.
Clear saved window states button will reset all the windows location and size to the default values.
When finished making changes to any of these options, click the Done button to save them and return to the main window. Click the Cancel button to return to the main window without saving any changes that might have been made.
The Messaging Tab allows you to set up the Email server settings and the Email user profiles.
The following window will appear:
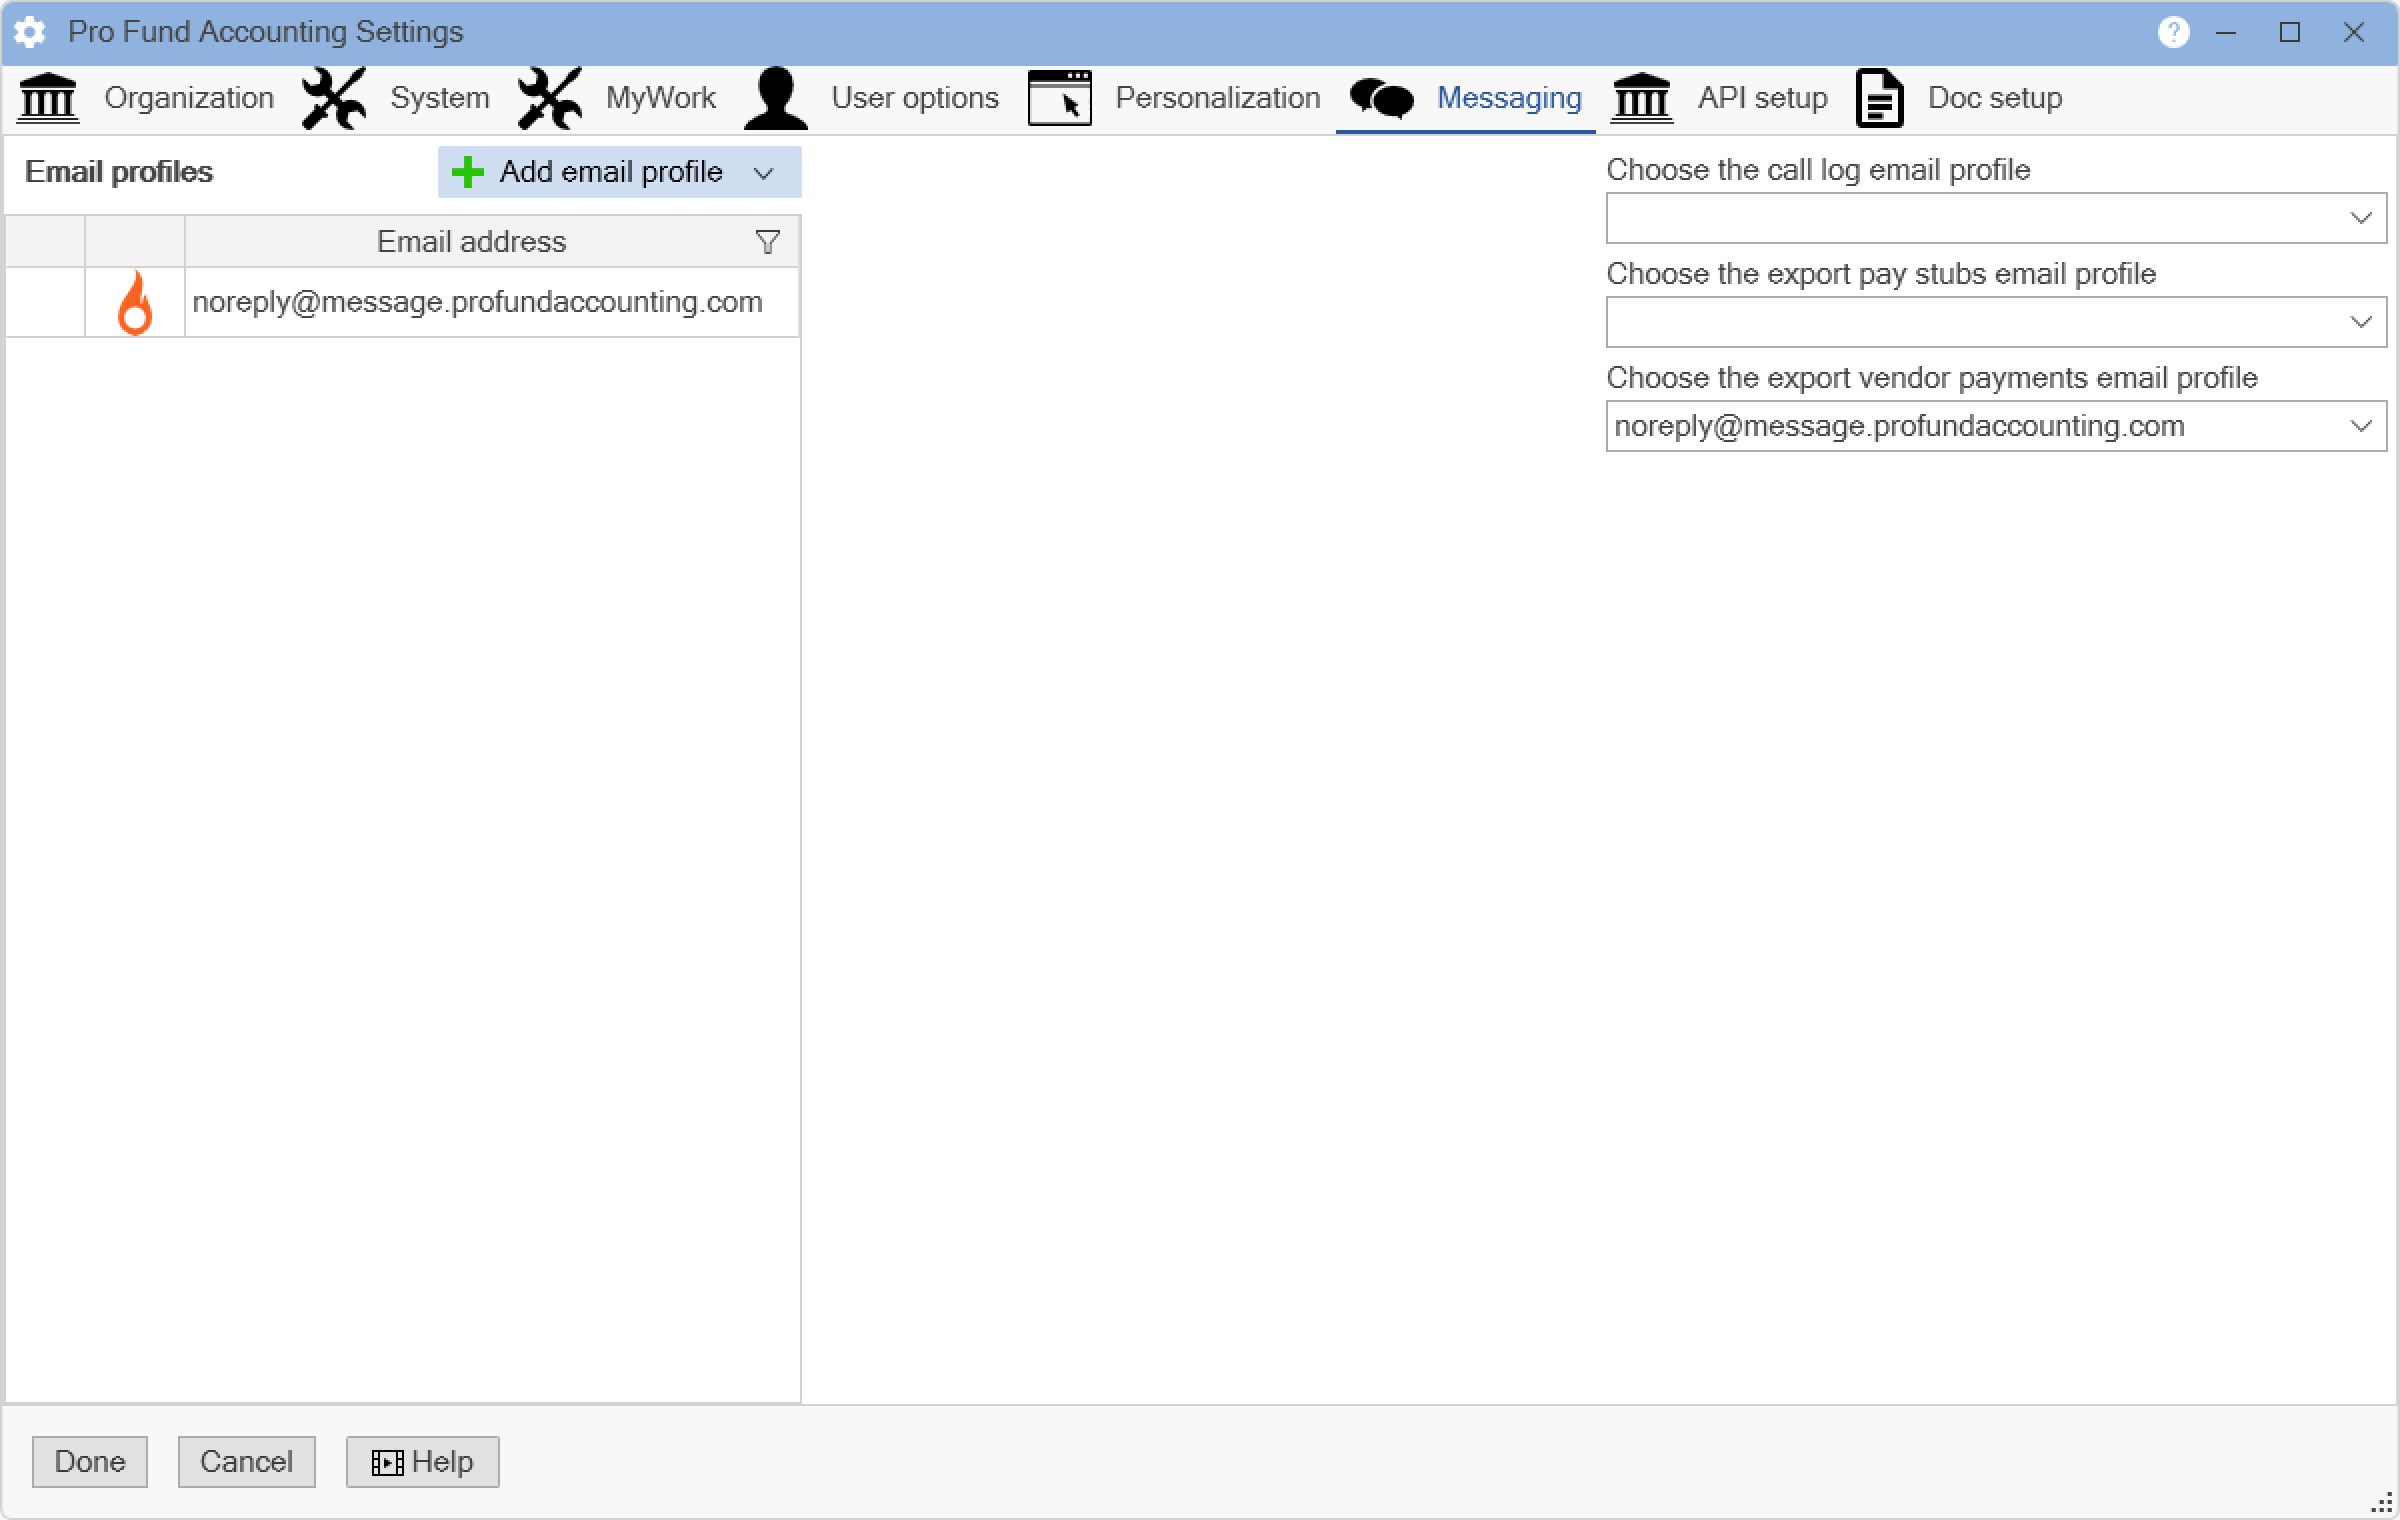
To add Email profiles to Pro Fund Accounting, select the Email provider by using the drop down list in the Add email profile field. The providers included in Pro Fund Accounting are Gmail, Microsoft, SparkPost, and SMTP. Enter the information needed for the provider.
By using the drop down list for each field, choose the email profile to use for the Call Log, the Export Pay Stubs, and the Export Vendor Payments menu items.
When finished making changes to any of these options, click the Done button to save them and return to the main window. Click the Cancel button to return to the main window without saving any changes that might have been made.
The Api setup Tab allows you to set API keys for any external APIs that Pro Fund Accounting supports.
The following window will appear:
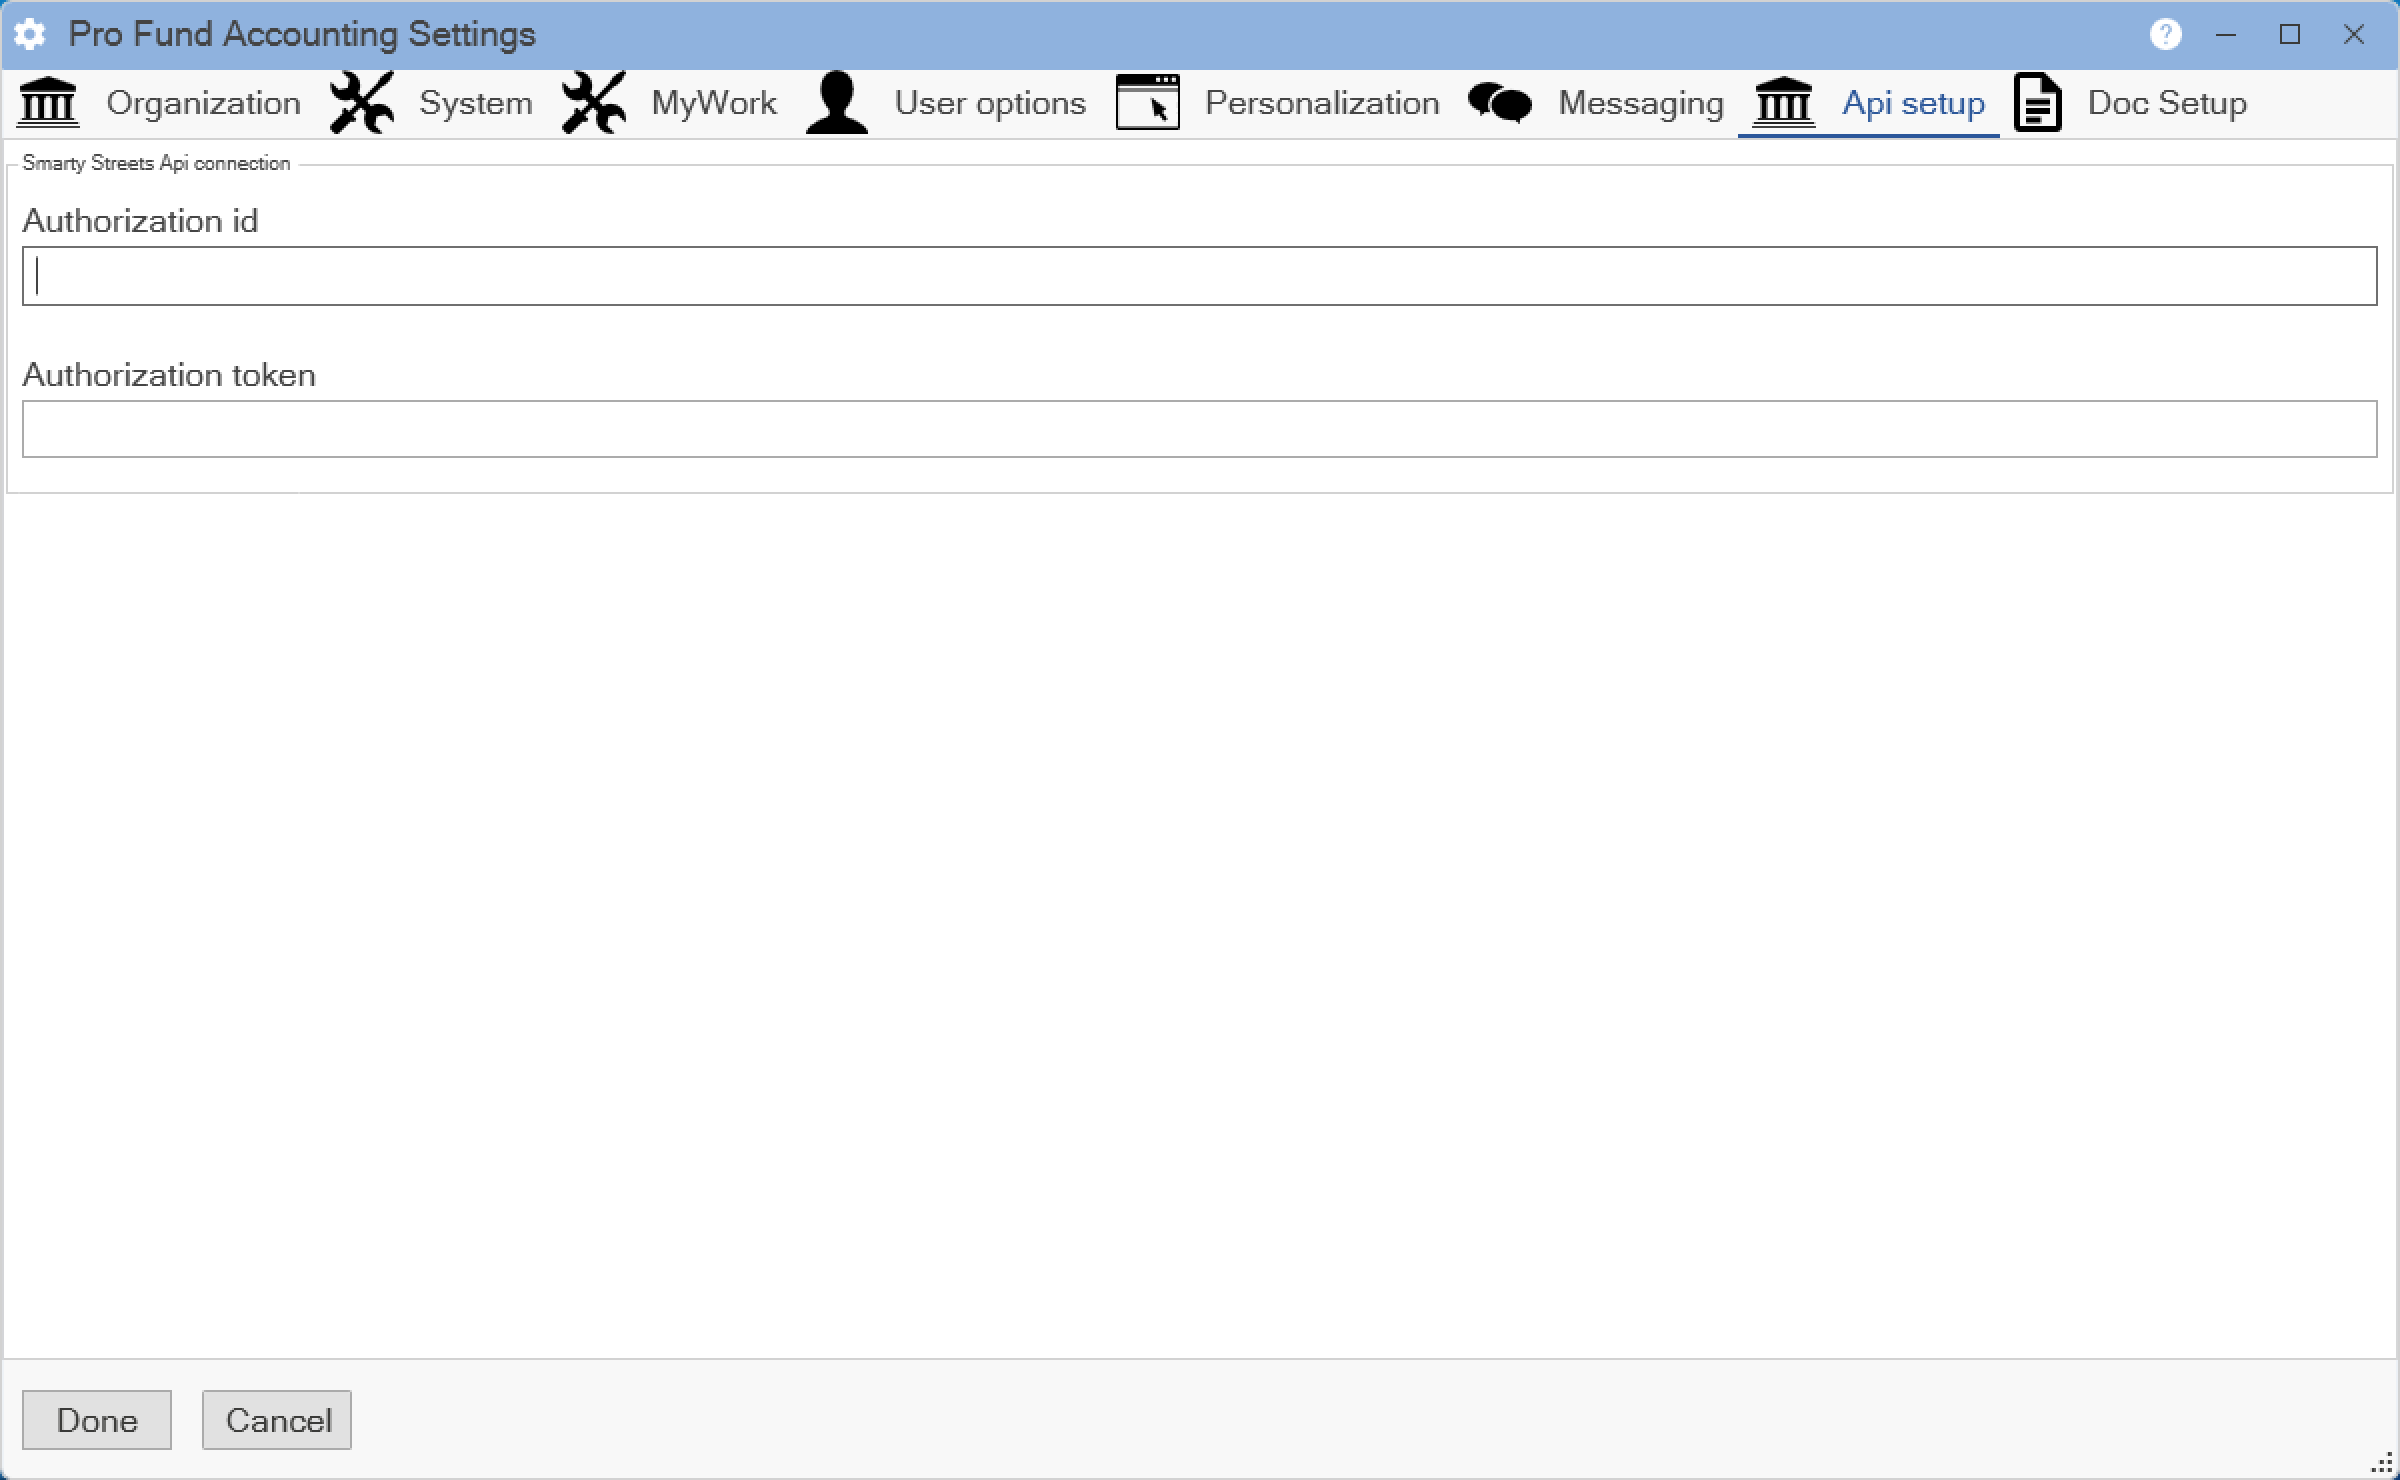
Smarty Streets Api connection:
We are currently using the API provided by Smarty Streets to power the address verification feature in Pro Fund Accounting. Verifying address information reformats the addresses so that they are in the proper format for CASS verification. Currently this is the only API connection that Pro Fund Accounting supports. If there are additional API connections that you would like to see, please send the relevant information about that API to sales@cogitateinc.com.
To receive your Authorization id and Authorization token, you must first go to https://smartystreets.com/ and click on the Sign up button to create a Smarty Streets account. They currently offer a free account with 250 address lookups per month but this is subject to change based on Smarty Streets pricing. You can find pricing for Smarty Streets at the following link Smarty Streets Pricing. Please direct any questions or concerns about Smarty Streets or for help signing up for an account to their customer service. Pro Fund Accounting support will not be able to help you with any Smarty Streets related issues.
When finished making changes to any of these options, click the Done button to save them and return to the main window. Click the Cancel button to return to the main window without saving any changes that might have been made.
The Doc Setup Tab allows you to specify whether the scanned in or imported documents are Local or Network shared and also where the files are to be stored.
The following window will appear:
.png)
Before using the Document Manager, you must set the location where documents will be stored. To do this, click on the Settings ![]() button at the bottom left corner of the main window. Click on the Doc Setup Tab. Select whether documents will be stored on the local machine or on a network share by using the drop down list in the Select the file hosting service field. Enter the path to the folder that will hold the documents by clicking on the Folder button at the end of the Choose the network directory for storage field. If saving to a file share and if required, Enter the Username for your chosen network directory and Enter the password for your chosen network directory to access the network folder.
button at the bottom left corner of the main window. Click on the Doc Setup Tab. Select whether documents will be stored on the local machine or on a network share by using the drop down list in the Select the file hosting service field. Enter the path to the folder that will hold the documents by clicking on the Folder button at the end of the Choose the network directory for storage field. If saving to a file share and if required, Enter the Username for your chosen network directory and Enter the password for your chosen network directory to access the network folder.
When finished making changes to any of these options, click the Done button to save them and return to the main window. Click the Cancel button to return to the main window without saving any changes that might have been made.