COMPLETE STEP-BY-STEP PAYROLL PROCESS
The following procedures list will walk you through setting up bank, deduction, department, payroll types, and payroll year start date records, and then – using that information – setting up employee records.
Setting Up Vacation, Sick and Personal Bank Types
If you track vacation, sick and/or personal hours earned and used by your employees, the first program to run is Bank Types Maintenance. It is located under the Payroll Menu bar in the Payroll Constants sub-menu.
Vacation Bank
.png)
When you’re on the main Bank Type entry screen, click NEW to set up a new bank type record. The first type we’ll set up is the Vacation Bank.
Enter VAC for the bank code, VACATION BANK for the description, VACATION for the short name 1, and VAC for the short name 2.
Vacation Bank Calc Types
If you allow your employees to carryover their unused vacation hours from one year to the next and you update their vacation banks:
•On the same date every year, the Calc Type should be 1
•On the anniversary of their hire dates, the Calc Type should be 2
If you do not allow your employees to carryover their unused vacation hours and you update their vacation banks:
•On the same date every year, the Calc Type should be 3
•On the anniversary of their hire dates, the Calc Type should be 4
When you’re through entering the bank setup information, your screen should look similar to the one above.
Click the PR/PRS Parameter Titles button at the bottom of the screen (the "Parameters Tab" is not used at this time).
.png)
Using either all UPPER CASE or Upper and Lower Case, enter a title for this bank’s parameter requirements. The title you enter here will be displayed on the employees’ records on their Banks tab. There is only one title required for any of the Bank Types and it is entered in the top "Parameter 1" box*. Enter the words "HRS TO ADD" (or "Hrs to Add") in this box. Actually, you can enter any title you Select in this box, but remember that it will need to be short so that it will display properly on the employees’ records.
*If you have set a limit on the number of hours that an employee can accumulate**, you will need to enter the title "Max Hrs" in Parameter 2 (above). On the employees’ bank records, enter the maximum number of hours you are allowing them to accumulate for each appropriate bank code.
If you allow your employees to carry over a set number of hours from their banks, enter the title "Rollover Hrs" in Parameter 3***.
**Note Parameter 2 is for Calc Types 1 and 2 only.
***Note Parameter 3 is for Calc Types 3 and 4 only.
Click SAVE to save your new Vacation Bank record.
Sick Bank
.png)
Use the above method to set up your Sick Bank record with the following exceptions:
•Make the bank code SCK
•Make the description SICK BANK
•Make the short name 1 SICK
•Make the short name 2 SICK
The rest of the information – including the title in Parameter 1 and the rules pertaining to Parameters 2 and 3 – remains the same. Use the same rules for deciding the proper calc type to use for the bank:
•On the same date every year, the Calc Type should be 1
•On a periodic timetable (e.g., every two months), the Calc Type should be 2
•On the same date every year, the Calc Type should be 3
•On a periodic timetable (e.g., every two months), the Calc Type should be 4
If you have set a limit on the number of hours that an employee can accumulate*, you will need to enter the title "Max Hrs" in Parameter 2 (above). On the employees’ bank records, enter the maximum number of hours you are allowing them to accumulate for each appropriate bank code.
If you allow your employees to carryover a set number of hours from their banks, enter the title "Rollover Hrs" in Parameter 3**. On the employees’ bank records, enter the Rollover Hours you are allowing them to carryover to the next year.
*Note Parameter 2 is for Calc Types 1 and 2 only.
**Note Parameter 3 is for Calc Types 3 and 4 only.
Click the SAVE button to save your new Sick Bank record.
Comp Time Banks
.png)
If your employees can earn compensatory time (comp time), set up a Comp Time bank. The only information you need to enter is a bank code and description. Comp banks do not have Calc Types. A sample completed Comp Bank screen is shown above.
Personal Banks
.png)
Finally, set up your Personal Banks. You may set up as many Personal Bank Codes as you want to track.
Use whatever codes you need to make each Personal Bank you set up unique (e.g., B for Birthday, A for Anniversary, PD for Personal Day, etc.).
There is one field on the Bank Types Info tab screen that you’ve not yet used: Associated Bank. This field tells the software that when a Personal Bank is posted to in the Payroll Posting program, the associated bank will be reduced if the Personal Bank has a balance of zero. For example:
Your employee has accumulated 32 hours in the Sick Bank and they want to take a personal vacation day off without losing their pay for that day. You would set up a Personal Bank with a code of PD and enter SCK in the Associated Bank field. This would tell the Payroll Posting program that when Personal Bank PD is posted to, if the bank doesn’t having any available balance to subtract from, to remove the hours from the Sick (SCK) Bank.
A Personal Bank record with an associated bank will look similar to the one above.
The rest of the information, including the Calc Type and title rules for Parameters 1, 2 and 3 on the PR/PRS Parameter Titles screen, is the same except that you will give your personal banks unique Bank Codes, descriptions, and short names 1 and 2.
Click SAVE after each new Personal Bank record you set up; click DONE to exit the program.
Setting Up Deduction Types
The next program to run is the Deduction Types Maintenance program. It is located under the Payroll Menu bar in the Payroll Constants sub-menu.
The Deduction Types Maintenance program is where you’ll set up the various deduction codes used in your payroll calculation program. These include federal withholding, FICA, Medicare, state withholding, voluntary deductions, etc. The first deduction we’ll set up is the Federal Withholding deduction code. Click the NEW button to start the new record setup.
Federal Withholding Deduction
.png)
Enter a code for the deduction. We used a "W" in our example above. You may use whatever code you want to make it unique. For example, we didn’t use an "F" for Federal withholding because we’re going to use the "F" for FICA.
Next, enter FEDERAL W/H for the description and FIT for short name 1. You may use whatever description and short name 1 you wish.
Enter your federal employer identification number in the W2 Info box.
Enter a calc type of 1 (see Payroll Constants: Deduction Types Maintenance for a complete list of calculation types).
Leave the Frequency and Tax Code fields blank.
Calc Orders: Why They’re Important
The order in which deductions are calculated is very important and the Calc Type you give to each deduction code dictates the order in which it is calculated. All taxes are taken first, unless there are deferred compensation or mandatory deduction codes that aren’t taxed. For example, you would want to make sure all the taxes were deducted from the employee’s gross; however, if the employee has tax exempt deductions, such as a mandatory health coverage deduction or a deferred compensation deduction, those deductions would be calculated first so that the tax calculations were based on the Gross Pay minus the tax exempt and deferred compensation deductions. Therefore, you should use the following numbering scheme for your deductions’ Calc Orders:
1.Place ALL your deferred compensation, pension, deferred retirement, and Plan 125 (also called "Cafeteria Plan") deductions in the 1 to 10 Calc Order range.
2.Place your federal, state, city, FICA and Medicare deductions in the 11 to 20 Calc Order range.
3.Place all other deductions in the 21 to 99 Calc Order range.
Using the above numbering criteria will insure that your employees’ wages will be properly taxed.
Note that you may give all your nontaxable deductions a Calc Order of 1; all your tax deductions a Calc Order of 11; all your other deductions a Calc Order of 21. The Calc Orders you assign do not need to be unique; however, be sure you haven’t given a tax deduction code the same Calc Order as a nontaxable deduction code. After setting up your deductions, run the PR DED CODE LIST report (located in Payroll Reports) to make sure your Calc Orders look right.
If the deduction you’re setting up is Deferred Compensation, click the Deferred Comp box; if the deduction is exempt from all taxes, click the Exempt box; if the deduction is State or City tax withholding, click the State/Loc Tax box. Since we’re setting up Federal Withholding in this example, you would not check any of these boxes.
The next field is the "Pay To" field. If you want to write a check for the deduction code, you need to enter an Address Code in the "Pay To" field. Address Codes are set up in the Address Maintenance program; however, you can set up an address code in the Deduction Types Maintenance program by clicking on the program maintenance icon. This icon is located after the drop-down arrow at the end of the "Pay To" field. (See Address Maintenance for information.)
If you already have an Address Maintenance file set up and you want to enter a "Pay To" code but can’t remember the code, click the drop-down arrow at the end of the field to see a list of available codes, and select the one you want.
Most municipalities use the IRS’s Electronic Federal Tax Payment System (EFTPS) and phone their taxes in. If you don’t want to print out a separate check for Federal Withholding because you use this feature or because your county treasurer deposits your taxes for you and you don’t need to write a check, leave the "Pay To" field blank.
If you deposit a physical check for your federal withholding, you will need to enter information in the "Pay To" field; otherwise, no check will ever be printed.
The last field, "Account #" isn’t used for the federal withholding deduction.
After entering all the above data, your screen should appear similar to the example above.
Note: You do not need to enter a "Pay To" code in order to finish setting up a deduction code.
Now, click the PR/PRS Parameter Titles tab at the bottom of the screen. (The Parameters tab is not used at this time.
.png)
There are at least two titles you need to enter for Federal Withholding: Number of Exemptions and Additional Amount.
•For Parameter 1 (at the top of the screen), enter "# of Exempt" or "# of Dep" or anything that reminds you to enter the number of dependents the employee is claiming for Federal Withholding.
•For Parameter 2, enter "Addl Amt" or "Additional" or "Extra W/H" or anything that reminds you to enter any additional withholding the employee wants deducted for Federal Withholding. NOTE: This parameter may also be used to withhold a flat amount from the employee’s pay rather than an additional amount. (See Employee Maintenance for additional information for this parameter.)
You may enter the following titles in Parameters 3 and 4 if you want:
•For Parameter 3, enter "Pct to W/H" or "Percent" or "%" or anything that reminds you to enter a flat percent that the employee wants withheld. Note that if you do this, you will need to make some modifications to the employee’s record to take flat percentage withholding into account. (See Employee Maintenance for further information.)
•For Parameter 4, enter "Adj" or "Adjustment" or anything that will remind you to adjust any erroneous withheld amounts on your employee’s Federal Withholding. For example, if you withheld too much tax, enter a negative dollar amount in the employee’s "Adj" box; if you didn’t withhold enough tax, enter a positive dollar amount.
After entering these titles, your screen should appear similar to the example above.
State Withholding
.png)
Using the steps you used for setting up your Federal Withholding deduction code, set up your State Withholding deduction code.
All the information entered for the Federal Withholding should be duplicated in the State Withholding code with the exception of the Code, Description, Short Name 1 and W2 Info. If you were issued a State Identification Number, enter it in the W2 Info field. Typically, this number starts with "69-". Enter the two-letter abbreviation for the state you’re setting up, and be sure to click the "State/Loc Tax" box.
Usually, you will write a check to the State for withheld state tax. So, you will need to enter a code in the "Pay To" field. If you want to include your state account number on the check stub, enter it in the "Account #" field.
The Calc Type is 3 and the Calc Order should be in the 11 to 20 range. Your screen should look similar to the example above.
The titles on the PR/PRS Parameter Titles screen are exactly the same as the Federal Withholding deduction (see above).
Click SAVE to save your State Withholding deduction.
City Withholding
.png)
If you need to deduct city taxes, set up a City Tax Withholding deduction using the same steps as you used for setting up your State Withholding deduction, except make the Calc Type 4 and the Calc Order should be in the 11 to 20 range. Your screen should look similar to the example above. In order for the city name to display properly on the W2 forms, use upper and lower case when entering the city name in the TAX CODE box. If your city name is long (e.g., Houghton Lake), abbreviate as much as possible.
.png)
The way that Calc Type 4 works is based on an annual exemption amount. For example, if the annual exemption amount is $600 and the employee claims 3 dependents, enter $1800 in Parameter 1. Parameter 2 is the percentage of pay to withhold. Parameter 3 is not used. Parameter 4 is used to adjust previous withheld tax (may be negative dollars to "give" the money back to the employee if too much was withheld). So, for the titles on the PR/PRS Parameter Titles screen, enter "Ann Exempt" or "Yrly Exm" or anything that will remind you want information is required in Parameter 1. Enter "Percent" or "%" in Parameter 2. Leave Parameter 3 blank (the phrase <NOT USED> will be displayed for this box on the employee’s deduction screen). Enter "Adj" in Parameter 4.
Click SAVE to save your City Withholding deduction.
FICA and Medicare
.png)
The FICA and Medicare deductions are very similar to each other with the difference being the Calc Type. Using the above steps, set up the FICA and Medicare deductions.
The FICA Calc Type is 2 and the Medicare Calc Type is 18. The Calc Orders should be in the 11 to 20 range. Your FICA screen should look similar to the one above. Your Medicare screen should like the one below.
.png)
For both FICA and Medicare, enter "Adj" in the Parameter 4 box. This is the only title you’ll need to set up for these two deductions. Parameters 1, 2, and 3 should remain blank. Your screen(s) should look like the one below.
.png)
Be sure to click SAVE to save your FICA and Medicare deductions.
Deferred Compensation
.png)
If your employees contribute to a deferred compensation plan, set up a deduction for each of the deferred compensation plans currently in use.
Note that you may have more than one deferred compensation plan.
Enter an identifying description for the deduction and DEFCOMP (or something similar) in short name 1. The Calc Type is 9 and the Calc Order should be in the 1 to 10 range. The Tax Code field contains the code assigned by the IRS for this type of deferred compensation. Our sample shows a tax code of G. Click the box next to "Deferred Comp" and enter the "Pay To" code from your Address Maintenance file. You can fill in an Account # if you have one. Your screen should appear similar to the one above.
Important: Do not check both the Deferred Comp and Exempt boxes
.png)
On the PR/PRS Parameter Title screen, enter "Amt" or "AMOUNT" or something that will remind you what needs to be entered on the employee’s deduction screen for this deduction in Parameter 1. Enter "Pct" or "Percent" in Parameter 2. Leave Parameter 3 blank. Enter "Adj" in Parameter 4. Your screen should appear similar to the one above.
Plan 125 – Cafeteria – Plans
.png)
Cafeteria Plans are not taxable by any of the taxing authorities. These types of deductions are managed by companies like BASIC Human Resources and, typically, cover mandatory health insurance coverage. You can set up as many of these deductions as necessary.
In our example, we have set up a Cafeteria Plan for employee contributions toward the cost of Blue Cross coverage. The Calc Type for this type of deduction is 17 and the Calc Order should be in the 1 to 10 range. Be sure to click the Exempt box to show this is a non-taxable deduction.
If you want this information to appear on your employees’ W2s, enter a very brief description in the W2 Info box, and the phrase "BOX 14" (in all caps with one space) in the Tax Code box. If you’re going to write a "pay check" for this deduction, enter the code in the "Pay To" field and an account number in the "Account #" field. If you’re going to write the check through Accounts Payable, do not enter a "Pay To" code or account number. Your screen should appear similar to the sample above.
On the PR/PRS Parameters Title screen, enter "Amount" or "AMT" in Parameter 1. If your employees contribute a percentage of their pay (as opposed to a dollar amount), leave Parameter 1 blank and enter "Pct" or "Percent" in Parameter 2. Leave Parameter 3 blank, and enter "Adj" in Parameter 4.
Your finished screen should look similar to this:
Click SAVE to save your Cafeteria Plan deduction.
MERS Deduction
.png)
If your employees contribute to MERS (Municipal Employees Retirement System), you will need to set up a MERS deduction. You may have multiple MERS deduction records depending on the Calc Types needed to cover all employees. For example, your salaried employees may contribute based on a different formula from your elected officials.
There are a number of MERS deduction definitions (see Payroll Constants: Deduction Types Maintenance for the MERS definitions). You will need to decide which of the Calc Types to use (there are both exempt and non-exempt types). If you use a non-exempt type (e.g., fully taxable), the Calc Order should be in the 11 to 20 range; if you use an exempt type (e.g., non-taxable), the Calc Order should be in the 1 to 10 range. Our sample (above) is setting up a non-exempt MERS deduction. Your Calc Type and Calc Range may differ, and, depending on the Calc Type, it may have a check mark in the "Exempt" box.
On the PR/PRS Parameter Titles screen, you’ll need to decide what Parameter Titles you need to enter. Refer to the complete list of deduction calculation types in the Payroll Constants: Deduction Types Maintenance section of this documentation to see what titles need to be entered.
Click SAVE to save your MERS deduction.
Miscellaneous and Voluntary
.png)
The rest of your deductions are things like Friend of the Court, Employee Advances, Personal Usage of a Company Car, etc. – any deduction that’s a straight dollar amount. You will need to set up a voluntary deduction record for each of your miscellaneous deductions.
Enter deduction codes, descriptions and short names 1 for each of your voluntary deductions. The Calc Type for voluntary deduction is 6 and the Calc Order should be in the 21 to 99 range. A sample voluntary deduction for Advances is show above.
On the PR/PRS Parameter Titles screen, enter "AMT" or "Amount" in the upper Parameter 1 box.
Click SAVE to save your voluntary deduction record.
FICA/Medicare Employer Match Deduction
.png)
The last deduction record you need to set up is for your municipality’s portion of the withheld FICA and Medicare. This deduction is required so that your matching amount of FICA and Medicare deducted from your employees’ pay checks is properly accounted for and deduction from your funds’ cash accounts.
Enter the deduction code EFM (Employer’s FICA Medicare). The description is Employer Match or anything that tells you want the deduction is for. The Short name 1, W2 Info, Frequency, and Tax Code fields may be left blank. Enter a Calc Type of 29 and a Calc Order of 99.
For the "Pay To" field, enter the code you set up for your Federal Withholding deduction, or leave the field blank if you electronically file your taxes or the county treasurer does it for you. There are no PR/PRS Parameter Titles required for this deduction. Your completed screen should look like our sample above.
When you’re through entering deductions, click DONE to exit the program.
Printing a List of Deduction Calc Orders
To help you keep your calc orders straight, you can print a report showing a list of deduction codes, calc orders, calc types, and exempt status. Click REPORTS on the main screen and select Payroll. The report name is PR Ded Code List. Double-click on it to select it, then click RUN to generate the report. When the report is complete it will be displayed on your screen and look similar to this:
.png)
We suggest than any time you change the Calc Order of a deduction or add a new deduction record you run this report so that you can use it to track any problems when you run Payroll Calculation or to see what your next Calc Order Number is when you’re adding a new deduction.
Setting Up Department Types
.png)
The Department Types Maintenance program is used to set up the FICA and MEDICARE department numbers so that your FICA and Medicare employer matching amount will be properly accounted for when you run the Payroll Calculation program.
Benefits of Setting Up Department Numbers
Several of the payroll reports create reports based on Department Numbers. If you ever need to get reports out for just your library, election workers, fire department, etc., you can se up department numbers for each of the fund numbers and give the employees who work in these areas the corresponding department number. Then, when you need to print a payroll report for just one of the funds, you can tell the report to include only the employees in that fund number’s department number.
Set up each department number where FICA and Medicare calculations are made. For example if you have a department number 2 where wages are posted and taxes are calculated for employees paid, set up department number 2. Next, give the department a name (e.g., Fire Department). Finally, enter the employee number that you have set up for your FICA and Medicare deduction check. In our example above, we have entered 0900 for both the FICA and Medicare employee number.
NOTE: You cannot use the same FICA and Medicare employee numbers for all departments; you’ll need to set up separate employee numbers for each FICA/Medicare department set.
If you’re unsure of the employee number(s) for FICA or Medicare, click the small drop-down menu button at the end of each field to select the proper employee number.
Be sure to click the SAVE button to save your new department record.
After you’ve finished setting up your department numbers, you should check your Employee Maintenance file to be sure you have the proper department numbers entered on all your employee records. (See Employee Maintenance (for references to this topic.)
Setting Up Payroll Types
Each of your employees will have a "Payroll Type" associated to the way they’re paid. The program is located under the Payroll Menu bar program in the Payroll Constants: Payroll Types Maintenance sub-menu.
Payroll types can be Regular, Overtime, Salary, Sick, Vacation Holiday, Comp Time, Miscellaneous, Meetings, Fire Runs, Reimbursed Expenses, etc. You may set up as many Payroll Types as you need. There is only one screen for each Payroll Type.
Hourly Payroll Types
.png)
The first payroll type we’ll set up is for Hourly (regular) employees. Click the NEW button and enter a code for hourly pay. You may use whatever code you wish. Next, enter a description for the payroll type and a short name 1 and 2. The information in Short Name 1 will be displayed when you’re posting payroll; the information in Short Name 2 is the title that will print on the employees’ pay stubs to identify their earnings.
The field called "PR Factor" is where you’ll enter the multiplier for this payroll type. The multiplier tells the Payroll Post program what to multiply the employee’s pay rate by whenever this payroll type is being posted. For hourly pay, you will enter a PR Factor of 1 to indicate the employee’s rate is to be multiplied by 1.
Since most of the payroll types you’ll be entering are taxable, click the "Taxable" box for hourly pay. If the bulk of your payroll time cards is for hourly pay, click the "Is Default" box. This tells the Payroll Post program to use "Hourly" as the default payroll type being posted. You may change this default at any time either by removing the check mark from the "Is Default" box or by selecting a different default type when posting payroll time cards.
Leave the "Bank Type" field blank. This field will be discussed later in this section.
Assign a different number for each of the Payroll Types you are setting up. Enter that unique number in the "PR Type Index" box (we used a 1 in our sample). This is the order the types will be printed on the employees’ pay stubs. You may want to use the following list for assigning your PR Type Index numbers:
1 for Hourly 5 for Sick
2 for Salary 6 for Vacation
3 for Overtime 7 for Meetings
4 for Holiday 8 for Elections
9 for Miscellaneous 10 for Reimbursed Expenses
This is all the information you need for the Hourly payroll type. Your screen should appear similar to the one above. Note that you can give this payroll type any name you wish. Click SAVE to save your new payroll type.
A Quick Word about Account Numbers
Typically, you will only need to assign a default account number to holiday, sick, vacation, miscellaneous, meetings, fire runs, and election workers. Indeed, you don’t need to assign default account numbers for any of the payroll types. This is just a shortcut when you’re posting time cards since an account number is required then. Entering default account numbers just helps speed up the posting process.
Since regular and salary employees’ pay can be in a number of different expense account numbers in several different funds, you wouldn’t want to enter default account numbers for their Payroll Types. So, you would only want to enter default account numbers for those pay types that are consistently posted to the same account numbers over and over.
Overtime Pay Types
.png)
Using the steps you used to set up your Hourly Payroll Type, set up a Payroll Type for Overtime. The only difference between this payroll type and Hourly (other than the code, description, and short names 1 and 2) is the PR Factor. The overtime payroll factor is 1.5 (for time-and-a-half). Enter a unique number in the PR Index field.
This is all the information you need to enter for this payroll type. Click SAVE to save it. Note: If you don’t pay overtime to your employees, you don’t need to enter this payroll type.
Comp Time Pay Type
.png)
This is a special payroll type for municipalities that allow their employees to earn compensatory time. This payroll type requires that you enter the expense account number for comp time. To earmark this payroll type for comp time usage in PR Post, be sure to check the Comp Time box and enter the bank code you set up for your Comp Bank. A sample screen is shown above.
Salary Pay Types
.png)
Using the above steps, set up a Salary payroll type. The only difference between this payroll type and Hourly (other than the code, description, and short names 1 and 2) is that in addition to clicking on the "Taxable" box, you must also click on the "Is Amount" box to tell the payroll posting program that the figures entered for this payroll type will be dollars rather than hours. The PR Factor is still 1. Enter a unique number in the PR Index field. Your screen should appear similar to our example. Click SAVE to save the payroll type.
Meetings, Fire Runs, Election Workers
.png)
If you pay a dollar amount for each fire run, board meeting, or your election workers for each election they work, you can set up a "salary-type" payroll type for each. The only difference between these records and your Salary payroll type is if you have a default account number set up for the expense. If you have more than one firehouse, though, you may skip the step of entering a default account number and enter the account number each time you post wages to your firemen.
If you do have a default account number for the payroll type, select the correct account number using one of the following methods:
•Enter the account number by hand. If you are using the segmented account number entry option, enter the first segment and press the TAB key to enter the remaining segments.
•Click the Account Tree button to open the account structure and type the name of the account you’re looking for. Click on the account when you find it and click APPLY to use this number.
Click NEW and enter a record for each of the above payroll types you want to set up. Your record should look similar to our sample above.
NOTE: If you pay hourly wages for any of these payroll types, do not click the "Is Amount" box.
Reimbursed Expenses
.png)
If you reimburse your employees for mileage, uniform rental, or other expenses they pay out of their own pockets, you will need to set up a Reimbursed Expense payroll type. You may enter as many reimbursed expense payroll types as you want to itemize on your employees’ pay stubs. Enter a code for the first reimbursed expense payroll type (We "lump" all reimbursed expenses together under one payroll type; we used an E for ours.), a description, and short names 1 and 2. Enter a PR Factor of 1 and assign a unique number for the PR Type Index.
Remove the check mark from the "Taxable" and click the box next to "Is Amount." When complete, your screen should look similar to our sample (above). Click SAVE to save the reimbursed expense payroll type.
Sick, Vacation, and Personal Pay Types
The last payroll types cover the employees’ sick, vacation and personal banks. If you track these banks, you will need to set up Payroll Types for each bank you have.
.png)
Enter a code or the bank you’re setting up. Enter a description, short names 12 and 2, and a PR Factor of 1. In the case of Sick Leave, if you don’t take taxes on all the sick leave posted, be sure to remove the check mark from the "Taxable" box.
Now, depending on what the corresponding bank is that you set up in Bank Types Maintenance, enter that bank’s code in the "Bank Type" box. For example, if you’re setting a payroll type for vacation, enter the code you used for the Vacation Bank (e.g., VAC). If you’re not sure what the bank code is, SAVE your record as it is so far, click DONE to exit the program, and then run Bank Types Maintenance to locate the correct bank code for this field.
If you have a default account number for this bank Payroll Type, select the correct account number using one of the following methods:
•Enter the account number by hand. If you are using the segmented account number entry option, enter the first segment and press the TAB key to enter the remaining segments.
•Click the Account Tree button to open the account structure and type the name of the account you’re looking for. Click on the account when you find it and click APPLY to use this number.
Finally, give the Payroll Type a unique PR Type Index. Your completed Bank Payroll Type should appear similar to ours above.
Continue setting up the remainder of your payroll types using the above examples. Don’t forget to enter a payroll type for Holiday or Double-Time (if you want; neither is required). When you’re through setting up Payroll Types, click DONE to exit the program.
Payroll Year Dates
The last program under the Payroll Constants sub-menu is Payroll Year Dates. This program is used to set up the starting date for your current payroll year.
.png)
Click NEW to enter a new payroll year start date. Enter the four-digit year in the PR Year column and enter the full date your payroll year starts. For example, if your payroll year starts on January 1, 2007, enter 01/01/2007.
Click SAVE to save the record and DONE to exit the program. You are now ready to start setting up employee records.
Setting up an Employee Record
Run the Employee Maintenance program. The program is located under the Payroll Menu bar on the main screen.
Each payroll record has nine screens associated with it: five employee information screens, a Banks screen, a Deductions screen, Third-Party Sick Pay screen, and Dependents screen. You may not need to use all of them and you don’t have to use them all. The ones that can be skipped will be noted when the screen is being discussed below. The first screen we will discuss is the Personal Info screen. It is the default screen you see when you run Employee Maintenance.
Personal Info Screen
.png)
You have two ways of assigning codes to your employees: Numerical employee numbers or Alphabetical. Select one of these two methods, but try not to use them both. Doing so will cause some strange sequences on any reports you process.
Note: You can assign numbers to your employees and then when posting payroll, you can elect to enter the employees based on their last names.
Enter a code for the employee. In our example, we used a number. Enter the employee’s name, address, and phone numbers in the appropriate fields. If the employee has an email address, enter that information. Also enter the employee’s date of birth, marital status, and social security number. That’s all the information required on this screen. Your screen should appear similar to the one above. Click the "Personnel Info" tab.
Personnel Info Screen
.png)
None of the information on this screen is required for payroll processing. It is merely a place to hold information you track for your own records.
This screen contains miscellaneous information about the employee including their sex, ethnic background, job description, driver’s license information, and physical information. Fill in all the information you feel is necessary for the employee. You screen may look similar to the one above. Click the "Employment Info" tab to continue.
Employment Info Screen
.png)
This screen contains a lot of information about the employee including date of hire, pay rate, raises, annual pays, etc.
Enter an A (UPPER CASE!) in the "Active Status" box. When you layoff, fire, or retire an employee, change this field to an I (inactive).
If you group your employees into department numbers, enter the department number. Enter the appropriate normal Payroll Type for the employee (see Payroll Types Maintenance). Next, enter the Date of Hire and Job Classification, if application (this field may be left blank). If you want to group your employees into different "types," you may enter any letter from A through Y to do so. Do not use the letter Z for an employee type; Z types are reserved for "Deduction Check Employees."
Next, enter the rate the employee usually earns. If the employee is salaried, enter the dollar amount they earn each pay day; if the employee is hourly, enter their regular hourly rate. If the employee earns additional money for performing work outside their normal work, enter the additional amount of money they make. Enter the additional dollar amount for salaried employees; enter the additional hourly rate for hourly employees.
For hourly employees, enter the standard hours per day they must work before they can earn overtime. Usually, this is 8 hours. Leave the "Week Start" and "Week End" date boxes blank.
Enter the number of times in a year the employee receives a paycheck. Use the following chart for entering this information:
01 = Paid annually
02 = Paid semi-annually
04 = Paid quarterly
12 = Paid monthly
24 = Paid twice monthly
26 = Paid every two weeks
52 = Paid weekly
Enter the late date the employee received a raise (only if you track this information; you may leave the field blank). The "Extra Pay" field does not apply. Please leave it blank.
If the employee record you’re setting up is a "Deduction Check Employee," enter the actual Deduction Code you entered in Deduction Types Maintenance. For example, when you set up the employee record for your matching FICA/Medicare deduction, you will enter both the FICA and Medicare deduction codes in the "Ded Chk Code" box (e.g., FM). If you wanted to combine Federal Withholding with the FICA and Medicare deductions, you would enter WFM.
If you exclude a portion of the employee’s gross wages from the MERS deduction (if applicable), enter the dollar amount you exclude in the "MERS Excl Pay" box.
The bottom portion of this screen has a number of Specialty Flags that you may check mark for information and reporting purposes. For example, if the employee has deferred compensation, click the box next to "Deferred Comp." Check whichever boxes are appropriate for this employee.
You may Select not to check any boxes in this area if you so wish except in the case of MERS: You must check mark the "Retirement" box for MERS to be reported.
When you’re through entering this information, your screen should appear similar to the one above. Click the "Insurance Info" tab.
Insurance Info Screen
.png)
You do not have to fill in any of the information on this screen for the payroll process to work with the exception of "Health Savings Account Info" area. If your employees contribute to a health savings plan, you will need to fill in the information this area requires (Division # and Match %).
Enter an A to indicate the employee is actively insured. If they’re not, make the insurance status an I. Enter the date their coverage went into effect and a single character code for the type of coverage they have. This coverage code is one you’ll supply. We used the following codes which you might find helpful:
S for employee only
R for regular family
2 for 2-member family
M for Medicare coverage
Y for 2-member family with a young adult rider
Again, this is a code you’ll make up and track for yourself. Use whatever codes you’ll find meaningful or intuitive. If the employee is married and their spouse is covered under their own insurance plan, enter the spouse’s name, employer, date of birth, and social security number.
In the "Emergency Contact Information" section, enter the contact name, phone number and extension (if applicable). Enter any comments you want to about the employee’s insurance and/or emergency information in the "Comments" field. Note that none of the information on this screen needs to be filled in; it is purely for your human resource department’s use.
After you’ve filled in this screen (if you’ve chosen to do so), it will appear similar to our sample above. Click the Overtime Info tab to continue.
Overtime Info Screen
.png)
The information on this screen may be skipped. Meant specifically for hourly employees, this screen contains information regarding the overtime the employee has earned, declined, maximum number of sick hours you’ll allow them to accumulate, a place for a speed dial number if you’ve programmed one for them on your telephone, and the department that should receive any overtime reports you generate.
As you begin posting payroll, most of this information will be updated automatically; however, if you track these things, you will need to enter the Maximum Sick Hours, the Overtime Hours Declined figure, and the Speed Dial and Department for Overtime Reports information. Note that you do not need to fill in anything on this screen unless you wish to do so. Without any information filled in, the screen should like our example above.
This ends setting up the main employee’s informational screens. Click the SAVE button to save your new employee record. Note that the new employee’s record will still be displayed on your screen.
Banks Tab
.png)
Now that you’ve entered the basic employee information, click the "Banks" tab at the top of the screen to set up any banks your employee may have. Click the NEW button to add a bank.
In our example, we have set up a Vacation Bank for the employee.
Remember when you set up the Vacation Bank we had you enter a title in the Parameter 1 field called "HRS to ADD"? Notice that this title is now displayed on the Banks screen. We have entered 160 hours to add for this employee. Whenever you run the Bank Calculation program, it will look at this screen to see how many hours should be added to the employee’s bank.
Let’s begin. First, enter an A to indicate this is an active bank. To turn the bank off, change the A to an I. The "Starting Bank Balance" field will display the available hours left in the bank. You may not enter anything into or change anything in this field except through the "Make Adjustment" screen (see Employee Maintenance for further information).
Leave the Start and End Date fields blank; they are not in use at this time. Finally, enter the number of hours to add to the bank when the Bank Calculation program is run. After you’ve entered this information, your screen should appear similar to our example above.
Click SAVE to save the bank record. Continue setting up new banks for the employees as necessary. When you’ve finished, click the "Deductions" tab at the top of the screen.
Deductions Tab
.png)
Click the NEW button to set up a new deduction code for the employee. In our example, we’re setting up the Federal Withholding deduction.
First, enter the deduction code you want to give the employee. The deduction code list can be accessed by clicking the drop-down arrow at the end of the "Ded Code" field. Once you’ve selected a deduction code, its name will displayed to the right of this drop-down arrow button.
Next enter an A in the "Status" field; to stop taking the deduction, change the Status field to an I. To the right of the Status field you will see "YTD Deducted" and a dollar amount. This is for informational purposes only; the amount may not be changed.
Leave the Start and End Date fields blank; they are not being used at this time.
Remember when you set up the Federal Withholding deduction type we had you enter a title in Parameter 1 called "# DEP" and a title in Parameter 2 called "EXTRA"? Notice that those titles are displayed on our sample screen. The software expects you to enter the number of exemptions the employee is claiming and any additional amount (if necessary) the employee wants to come of their pay for Federal Withholding.
If the employee wants to take the same dollar amount out each time regardless of how much their gross pay is, enter a 99 in Parameter 1 (# DEP), and the amount they want withheld in Parameter 2 (EXTRA). This rule is also true for State Withholding; it does not apply to FICA or Medicare.
If the field is labeled "<NOT USED>", then nothing is required and the field should be left empty. When you’ve finished entering the information for the deduction, your screen should look similar to ours above.
Continue entering the deductions for the employee. When you’re through, click the "3rd Party Pay" tab.
Third Party Pay Records
.png)
Third party sick pay isn’t required when you set up new employee records. If they receive disability pay from a third-party payer, though, you will need to enter the information reported to you by the payer on this screen if you want it included on the employee’s W2 form. See Employee Maintenance for full information on entering third-party pay. Now, click the "Dependents" tab.
Entering Dependent Records
.png)
Again, entering information on the Dependents screen isn’t required for processing your payrolls. It is simply here for informational purposes. To enter a dependent, click NEW. Enter the dependent’s first and last names and middle initial. Next, enter the dependent’s relationship to the employee, their sex, date of birth of Social Security Number. Continue entering dependents using the above method. You may print a list of the dependents, by employee, from the Payroll reports.
When you’re done setting up new payroll records, click the DONE button. If you’re asked whether you want to save the changes you made to the employee’s record, click YES.
Posting Payroll
Step 1: Payroll Information
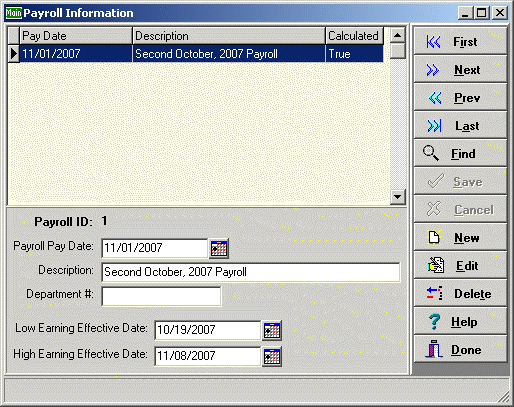
Before you can post a payroll, you will need to run the Payroll Information program to set up your pay date information. Payroll Information is located under the Payroll Menu bar or you may click the PR INFO button on the main screen. Enter the date you’re going to pay your payroll in the "Payroll Pay Date" field, a description for the payroll (to help you identify it), the Department number the pay is being set up for (if you’re only paying one department), and the Low and High Earning Effective Dates in their appropriate field. Click SAVE to save the information record, and DONE to exit the program. You may now post a payroll.
Step 2: Posting Time Cards
To run this program either select "Payroll Post" from under the Payroll Menu bar or click the PR POST button on the main screen.
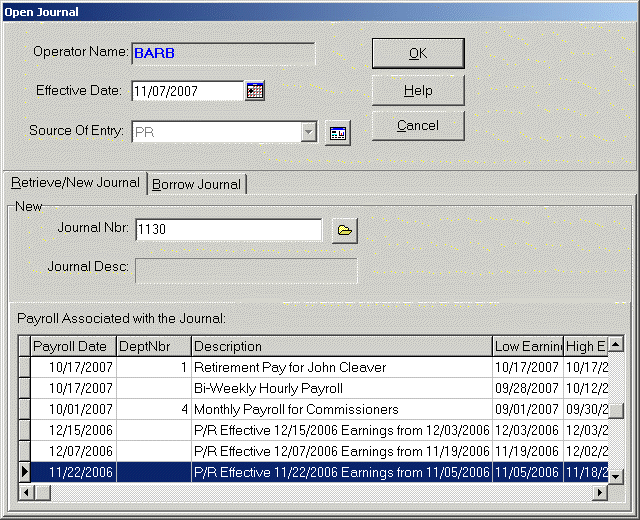
The first thing you’ll need to do is fill in the Open Journal screen (see above). The Effective Date field will automatically contain today’s date. You may change this date where necessary. Also filled in will be the PR source of entry. This may not be changed.
Next, select the Payroll Information record you want to post to. Your effective date must fall within the Payroll Information record’s Low and High Earning Effective Dates. If it doesn’t, you’ll will receive an appropriate message warning you about this.
If you want to post to a new Journal Number, simply click OK to accept the displayed number. If you want to post to a Journal Number that you’ve posted to before, either enter the Journal Number you want to post to or click the folder icon to locate the Journal Number from the list. Again, the effective date you’re using must be included in this previous Journal’s dates and meet the low and high date criteria for the Payroll Information record. When you’re ready to proceed, click OK.
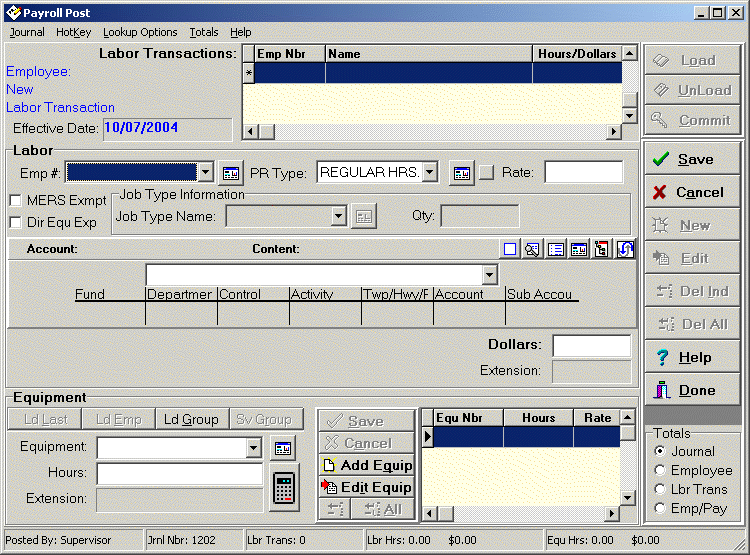
Click the NEW button to start a new entry. Enter the employee number. If you don’t know the number, click the drop-down arrow at the end of the "Emp #" field to locate it, and double-click on it to select and accept it. Press the TAB key and enter the "PR Code." If you selected one of your payroll types to be the "default," it will be automatically displayed and you won’t need to enter it. If you want to switch the payroll type, click the drop-down arrow at the end of the "PR Code" field and click on the one you want to use. The employee’s default payroll rate will be displayed in the "Rate" field. You may either accept this rate by pressing the TAB key, or you may change the rate by typing in a different rate. If the employee is salaried, you will see zeroes (0.0000) in this field and you should not enter a rate here unless you want to input hours for the employee for this entry only.
If you are using Job Costing (see Preferences-Post Options and Job Types Maintenance), Job Type information will be displayed on your screen. Enter the Job Type Code and the Job Type Quantity.
Press the TAB key to go to the account number. If you have a default account number set up for this payroll type, that account number will be displayed. You may accept it or enter a different account number to post these wages to.
After entering the account number, press the TAB key and enter either the number of hours if the employee is hourly. If the employee is salary, their regular salary will be displayed. If you need to change the salary, you may do so. Note that in neither case is the "Extension" field’s amount changeable. When you have saved your entry, your screen will appear similar to our sample above.
The posting status line at the bottom of the screen displays various information depending on the Totals options you’ve chosen.
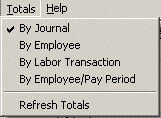
The default Totals selection is for the Journal Number you’re posting to. You may Select whichever of these options is most useful. The only change you’ll see on your screen is at the very bottom on the Posting Status Line. Experiment with the various Totals options to see the changes on your posting status line and select whichever one you want to use.
Continue posting time until you’ve finished one day’s worth of time cards. When you’re ready to start a new day, click COMMIT to save your entries. Fill in the "Save Journal As" description to identify your committed payroll journal and click OK to save it.
After your journal has been committed, you will see a window pop up telling you that the journal was successfully committed and you will be back on the main posting screen. The only active buttons on the screen at this time are the LOAD, HELP, and DONE buttons. To continue posting the next day’s time cards, click the LOAD button and continue as above by filling in the Open Journal information screen with the following exceptions:
1.If you want to continue using the same journal number for the entire pay period, enter the next day’s effective date that you’re going to post, click the folder icon and double-click on the journal you want to continue posting to.
2.If you want to have a different journal number for each day in the pay period, enter the next day’s effective date you’re your going to post, and click OK to accept the displayed journal number.
Continue by posting the next day’s time cards. This time, though, when you click the COMMIT button to save your entries and the "Save Journal As" screen appears, you will see that the journal description you entered for the journal when you created it is displayed. If you decide you want to change the name to something else and type in a new journal description, you will see a message telling you that the journal number already has a description and asking you if you want to change it. This is just a "heads up" message telling you that the journal description will be changed – the data contained in the journal will not be harmed or overwritten. To accept the new journal description, click YES; to keep the old journal description, click NO; to change the journal description to something else, click CANCEL.
Note: You won’t see the above message or an existing journal description if you’re using different journal numbers for each day in the pay period.
Continue posting your payroll until you’ve finished. Click COMMIT to save your entries, and when you’re back on the main posting screen, click DONE to exit the program.
Step 3: Calculating Deductions
You’re now ready to calculate your deductions. The Payroll Calc program has its own button on the main screen. Click it to start the deduction calculation process.
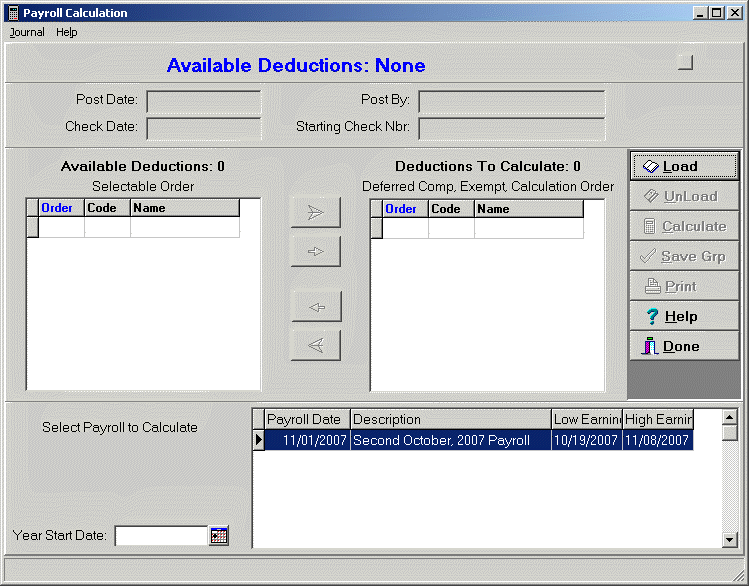
This screen will be blank except for the Payroll Information records that have not yet been calculated. Select the record you’re calculating and click the LOAD button.
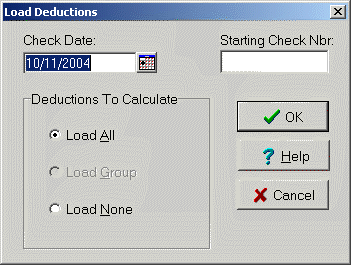
You will only need to enter the starting check number; the Payroll Date will be automatically filled in with the date you used when you ran Payroll Information.
You will see that you have three choices for the way your deductions to calculate can be loaded. They are:
1.Load All. If you Select this method, then all the deduction codes you have set up will be loaded into the "Deductions to Calculate" column on the main PR Calc screen.
2.Load Group. Note that the first time you run this program, this option will be grayed out. This method is discussed in the Payroll Calculation program.
3.Load None. If you Select this method, then all the deduction codes you have set up will be loaded into the "Available Deductions" column on the main PR Calc screen.
For now, click the "Load None" option and click OK. Your screen should appear similar to the one below.
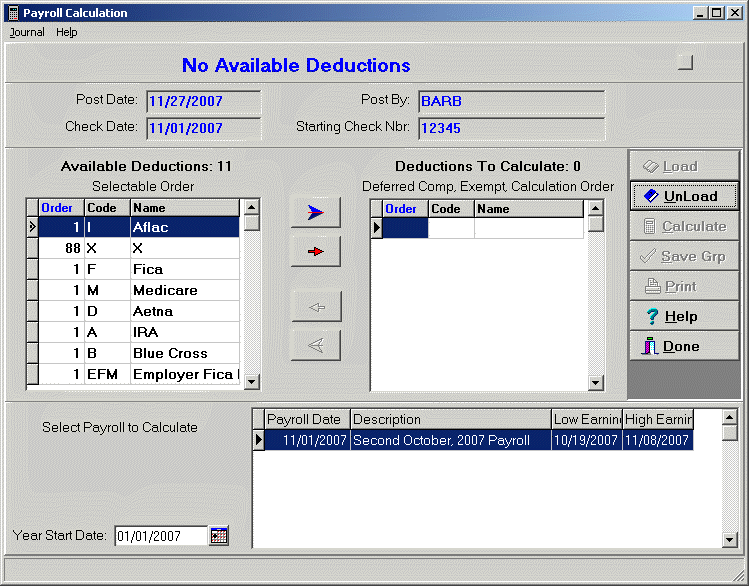
You will see that all your deduction codes are listed in the left-hand column ("Available Deductions"). Locate the deductions you want to calculate and either double-click on them to move them to the right-hand column ("Deductions to Calculate") or highlight a deduction and click the red right-arrow button. You can move all the deductions over (or back) by using the larger blue arrow keys.
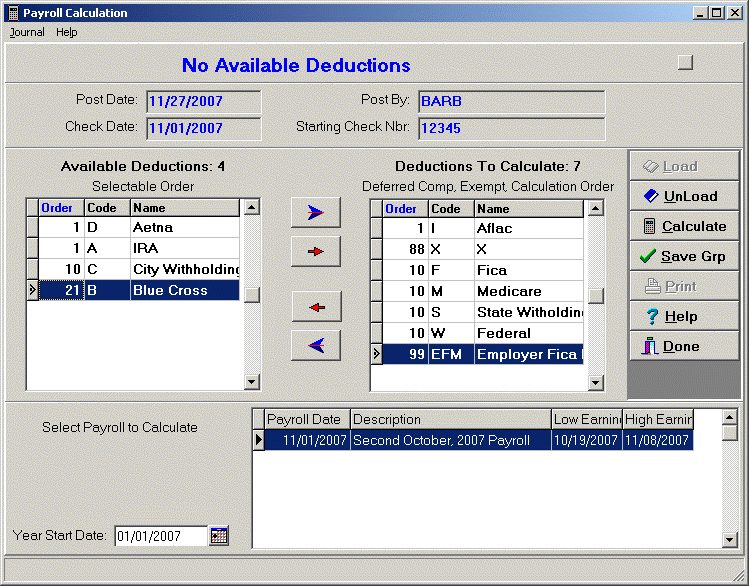
Now, before you click the CALCULATE button to start the calculation process, note that the SAVE GRP button is active. Setting up groups of deductions allows you to select deductions that are only calculated once a quarter, once a month, etc. For example, if Blue Cross is only deducted from the employees’ pay once a month and you pay your employees weekly, you could save a group of deductions that included the taxes and Blue Cross deductions and name the group "Blue Cross." Or if your employees contribute to a deferred compensation plan once a quarter, you could save a group of deductions that included the taxes and deferred compensation deduction codes and name the group "Def Comp." See Payroll Calculation for full information regarding saving deduction groupings.
Once you’ve selected the deductions you want to calculate, click the CALCULATE button. After the calculations are finished, you will see this information window pop up on your screen:
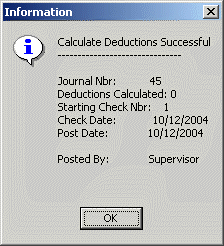
The window is telling you the Journal Number the program created for this set of payroll deductions, the number of deductions that were calculated, your starting payroll check number and date, the date the journal was posted, and the person who created the journal.
The only important information you should make note of is the Journal Number. In case you need to access the journal to reverse payroll calculations or to renumber one or more payroll checks, you’ll be asked to supply this number to the program. Click OK to close the information window. Click DONE to exit the program.
Step 4: Printing Reports
Print any of the payroll reports you want by clicking the REPORTS button on the main screen. Click the "+" next to Payroll and select any of the reports on the list. We suggest you run (at least) the Payroll Gross and Net report. The report will have some important information on it. The thing you want to really watch for is whether or not there’s an employee (or deduction) that shows a net pay amount but doesn’t have a check number assigned to it. When you see this happen, it means that the money will be deducted from your cash account(s) but the check won’t be printed. See Payroll Calculation Procedure Notes and Correcting Errors for help on correcting the problems that you may encounter.
Examine the reports and if they’re okay, you’re ready to print your pay checks and a payroll journal. When the checks are displayed on your screen, verify that they’re correct by comparing them to the Payroll Journal you printed. When you’re ready to print the checks, click the printer icon on the Crystal Reports screen. You may want to print the checks, first, on blank paper to verify that they’ll fit the format on your stock checks. You can use these "test" checks for your file copies.
Step 5: If there is a problem Reverse Payroll Calculations
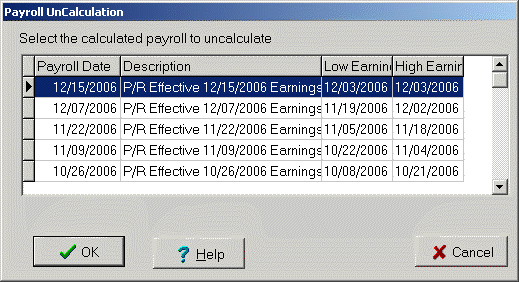
Run the Uncalculate Payroll Deductions program. It is located under the Payroll Menu bar on the main screen.
You’ll be asked to select the Payroll Information record you want to uncalculate. Do so and click OK. After the deductions are reversed, you’ll be told the process finished successfully. Make the necessary corrections either by examining the deduction types you’ve set up (see Deduction Types Maintenance) or by posting additional time or correcting posting errors (see Posting Payroll). Then, run the PR Calc program again. And prepare a new Payroll Gross and Net report.
Employees without Check Numbers
If you find that an employee is showing net pay on a payroll journal or gross and net pay report but there is no check number associated with the check amount, it usually means that the employee’s gross pay was small enough that no taxes were deducted. (See "Voucher Only Checks" in Employee Maintenance.) To remedy this problem, you will need to set up a "zero deduction" code for the employee. A zero deduction code forces a check number to be issued to the employee.
If you don’t have a zero deduction code set up, run Deduction Types Maintenance and set up a code ZD (Zero Deduction). The Calc Type is 29 and the Calc Order is 99. Make sure that none of the special boxes are check marked. Save the new deduction, and then run Employee Maintenance. Locate the employee that needs the zero deduction code and click the "Deductions" tab. Click NEW and give the employee the ZD deduction. Remember to make the deduction code active by typing an A in the "Status" box. Click SAVE to save the deduction code and DONE to exit the program.
If you haven’t done so already, run Uncalculate Payroll Deductions, then recalculate the payroll. This time the employee should have a check number issued.
If the employee still isn’t showing a check number, it may be that the "Vouchers Only" box in the "Specialty Flags" section of Employee Maintenance (on the "Employment Info" screen) is checked. To see if this is the case, run Employee Maintenance, locate the employee, and click the "Employment Info" tab. If you see a black check mark in the "Voucher Only" box, click EDIT, then click the box to remove the check mark. Save the change, click DONE, run Uncalculate Payroll Deductions, then recalculate deductions.
If this still doesn’t resolve the problem, please contact us.
This completes a full payroll process – from setup, to posting, to calculating, to printing checks.